Homestyler provides an extensive model library for furnishing and decorating your rooms. You can also upload your own 3D models and 2D materials to create more personalized designs.
Uploaded models and materials are saved to your personal model library and can be reused across different projects.
This guide explains how to select an upload type, upload a 3D Model, use uploaded content, and resolve common upload issues.
For file preparation requirements, see: [Homestyler Model Creation Guidelines and Upload Requirements].
1. Before You Upload
Review the following rules before uploading a model:
·The upload limits for 3D models and 2D textures vary by membership:
·Basic (Free) users: Up to 3 3D models and 3 2D textures
·Pro members: Up to 300 3D models and 300 2D textures
·Master members: Up to 500 3D models and 500 2D textures
·Team members: Unlimited 3D model and 2D texture uploads
·Always select the correct model category. The category affects how the model is displayed, snapped, positioned, and replaced in the design tool;
·Uploaded 3D models cannot be split into individual components in Homestyler;
·For greater flexibility, upload large furniture sets as individual models. For example, upload a dining table and dining chairs separately;
·The account used to upload a model can use and edit it. If the design is shared with others, they can also use the uploaded model within that design.
2. Select an Upload Type
Select the upload type that matches your file and intended use.
2.1 3D Model
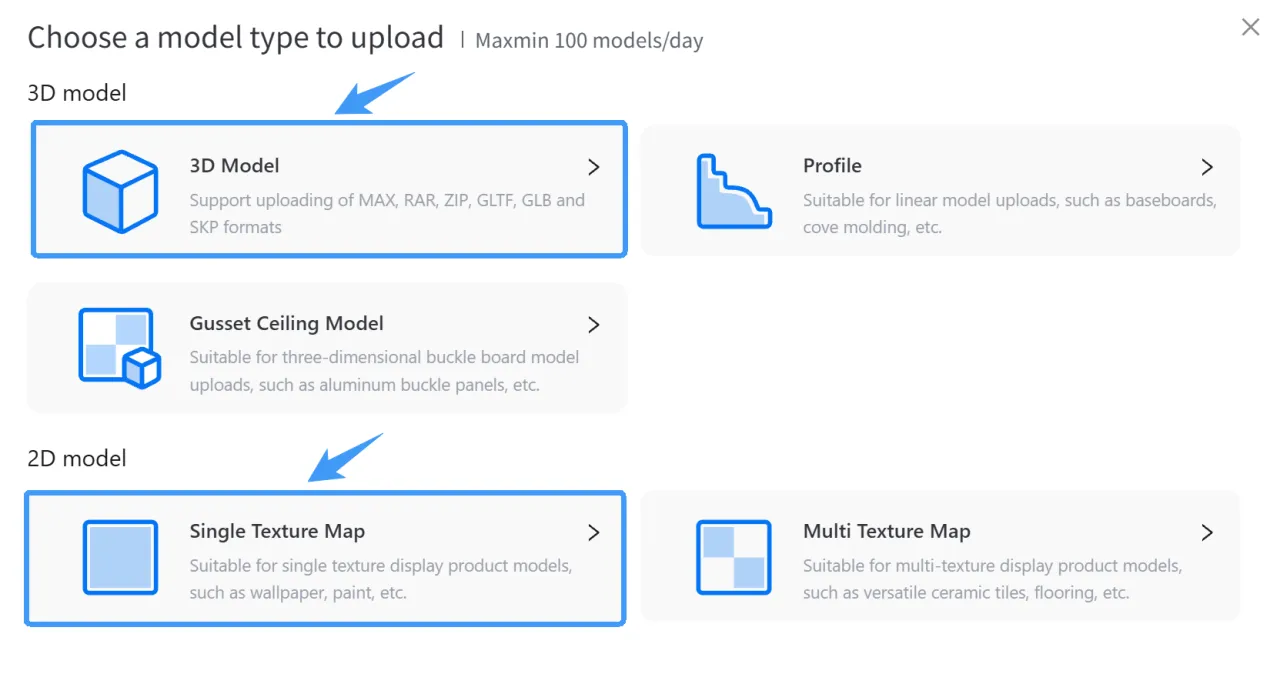
Primarily supports 3D models created and exported from 3ds Max or SketchUp (SU), including furniture, appliances, doors, windows, and decorative objects.
Examples include beds, sofas, tables, chairs, cabinets, and accessories.
2.2 Single Texture Map
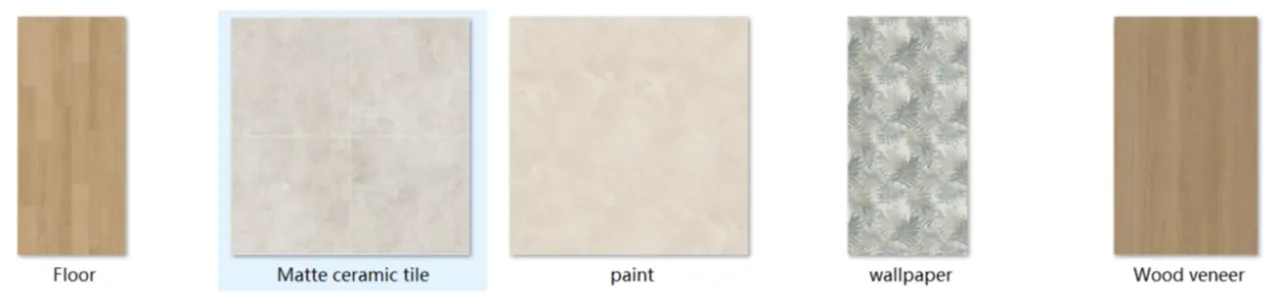
Use Single Texture Map for materials displayed with one texture image, such as wood finishes, wallpaper, paint, and ready-to-use flooring or tile textures with grout lines.
2.3 Multi Texture Map
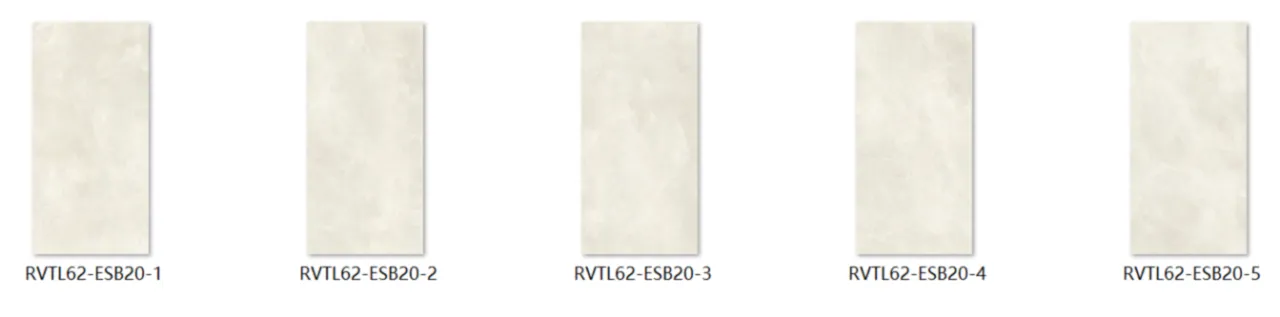
Use Multi Texture Map for materials containing multiple texture variations, such as stone, tile, and flooring collections.
After uploading, use the material with the Pattern tool to create different laying patterns.
2.4 Profile
Currently supported only for ceiling mouldings and baseboards. Upload a CAD cross-section in DWG or DXF format.
·Crown Moulding and External Corner Moulding: for ceiling applications.
·Baseboard: for wall base applications.
2.5 Gusset Ceiling Model
Use Gusset Ceiling Model for three-dimensional ceiling panels, such as aluminum ceiling panels.
Recommended: For most 3D objects, select 3D Model. For most 2D materials, select Single Texture Map.
3. Open the Model Upload Page
You can access the model upload page in two ways.
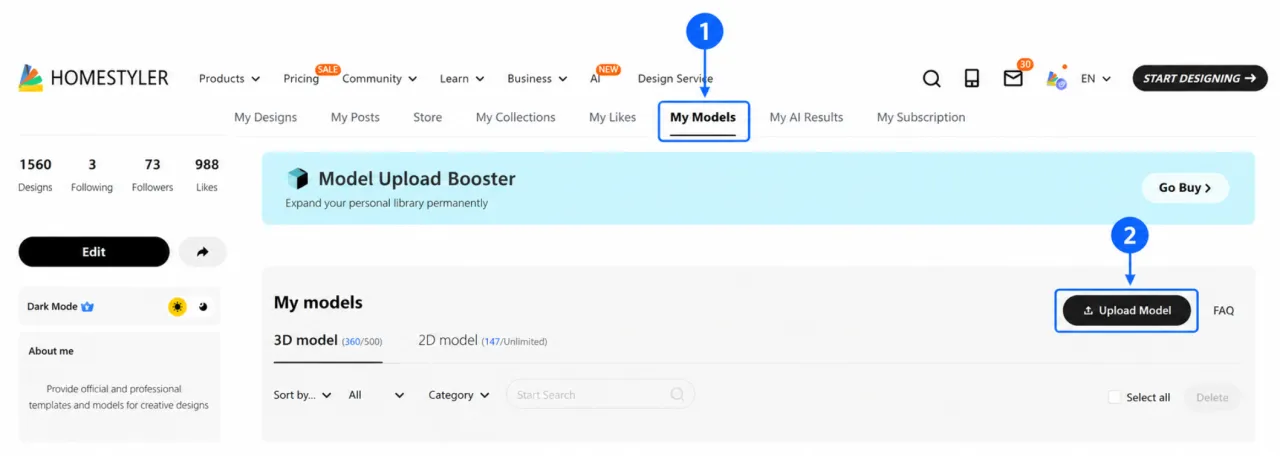
Path 1: From My Workspace
Go to:
Homestyler Website > My Workspace > My Models > Upload Model
Path 2: From the Design Tool
Go to:
My > Uploads > Upload Models/Textures
You will be redirected to the My Models page. Click Upload Model to continue.

4. Upload a 3D Model
Step 1: Select a Model File
Click 3D Model, select the file you want to upload, and click Open.
Supported formats include:
MAX, RAR, ZIP, GLTF, GLB, SKP, FBX, and OBJ
Hold Ctrl while selecting files to upload multiple models at once.

Step 2: Submit the Uploaded Model
Wait for the file upload to finish, then click GO Submit to open the model editing page.

Step 3: Select a Model Category
Under Edit, click Submit. Select the correct model category in the pop-up window, then click Confirm.
Important: The selected category affects automatic snapping, model placement, display behavior, and replacement logic in the design tool.

Step 4: Wait for Processing
After submission, wait for processing to finish and for the model thumbnail to appear.
A 3D model typically takes approximately 20 minutes to process. The actual processing time may vary depending on the file size and model complexity.
Batch upload tip: If multiple models belong to the same category, select them together and click Submit at the top of the page to edit them in one batch.
For other model upload instructions, see:
[How to Upload a Single Texture Map]
[How to Upload a Multi Texture Map]
[How to Upload a Profile Model]
5. Use Uploaded Models and Materials
Open a design project and go to: My > Uploads
Select a category based on the uploaded content:
·3D Model: View your uploaded 3D models;
·Texture and Image: View your uploaded 2D materials.
Select the model or material you need, then add or apply it to your design project.

6. Common Issues and Solutions
If a model fails to upload or does not process correctly, review the following issues. Check the file format, model structure, materials, textures, and related settings, then make the necessary adjustments before uploading again.
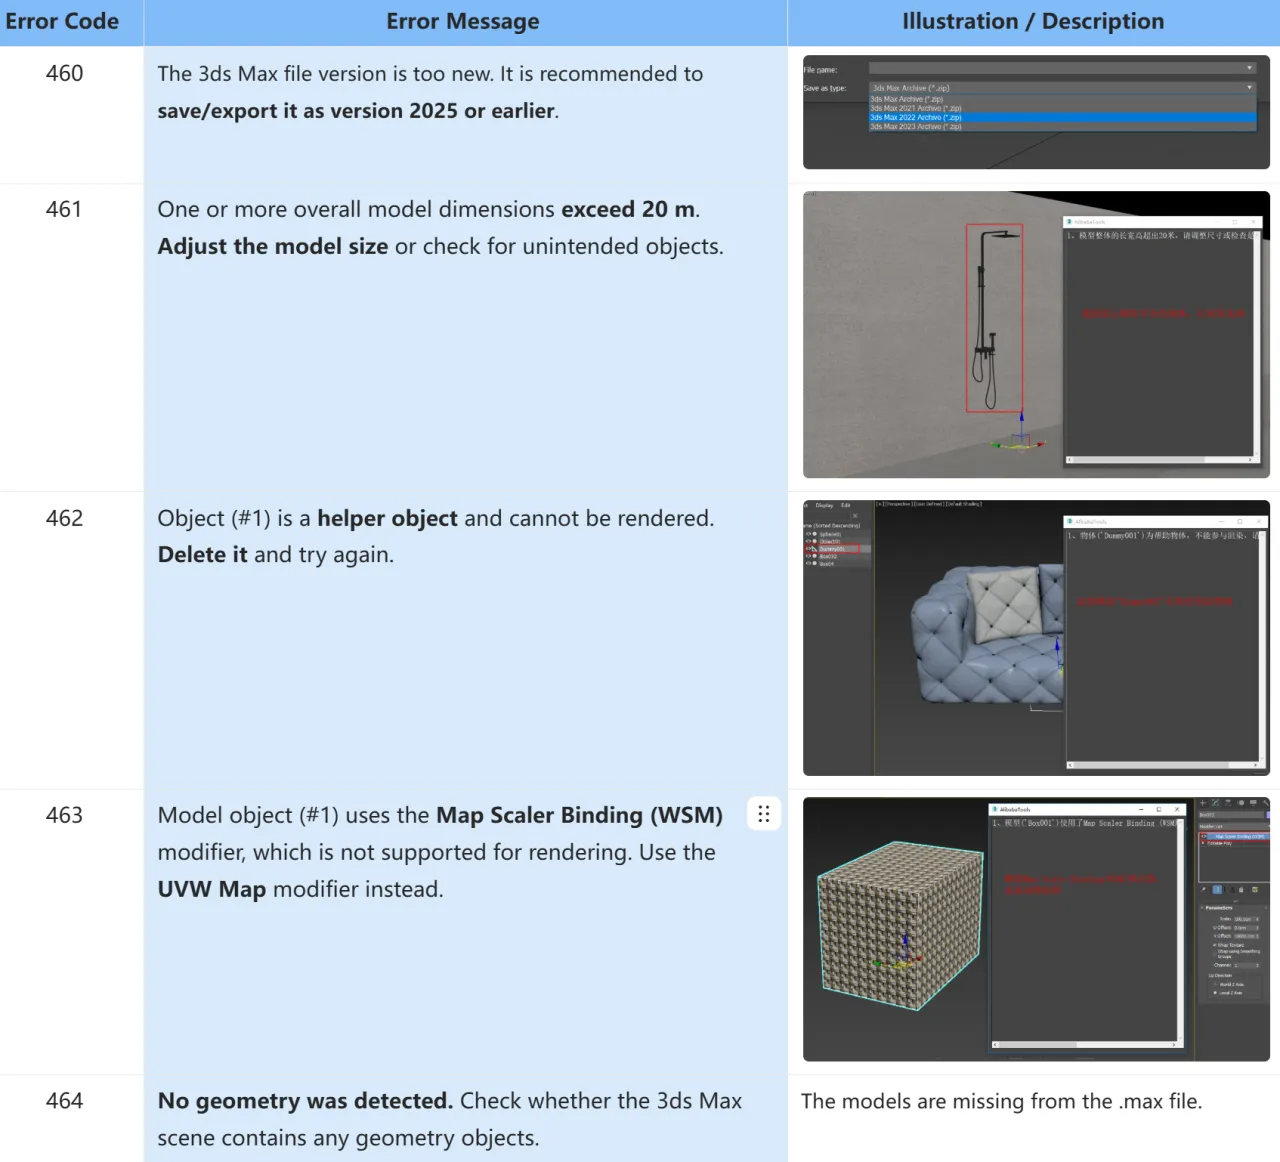
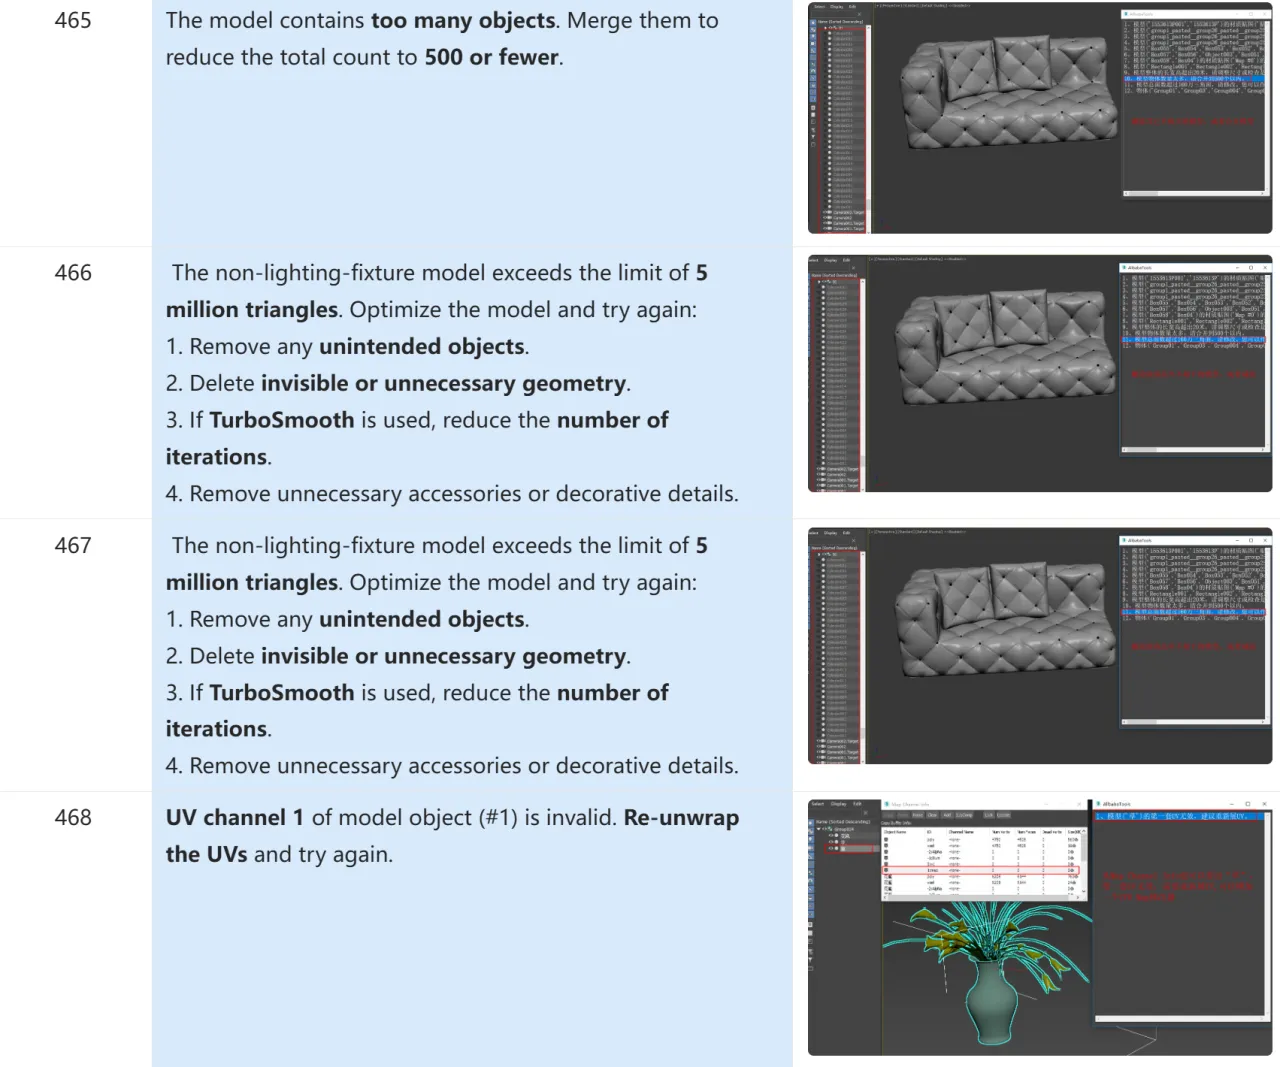
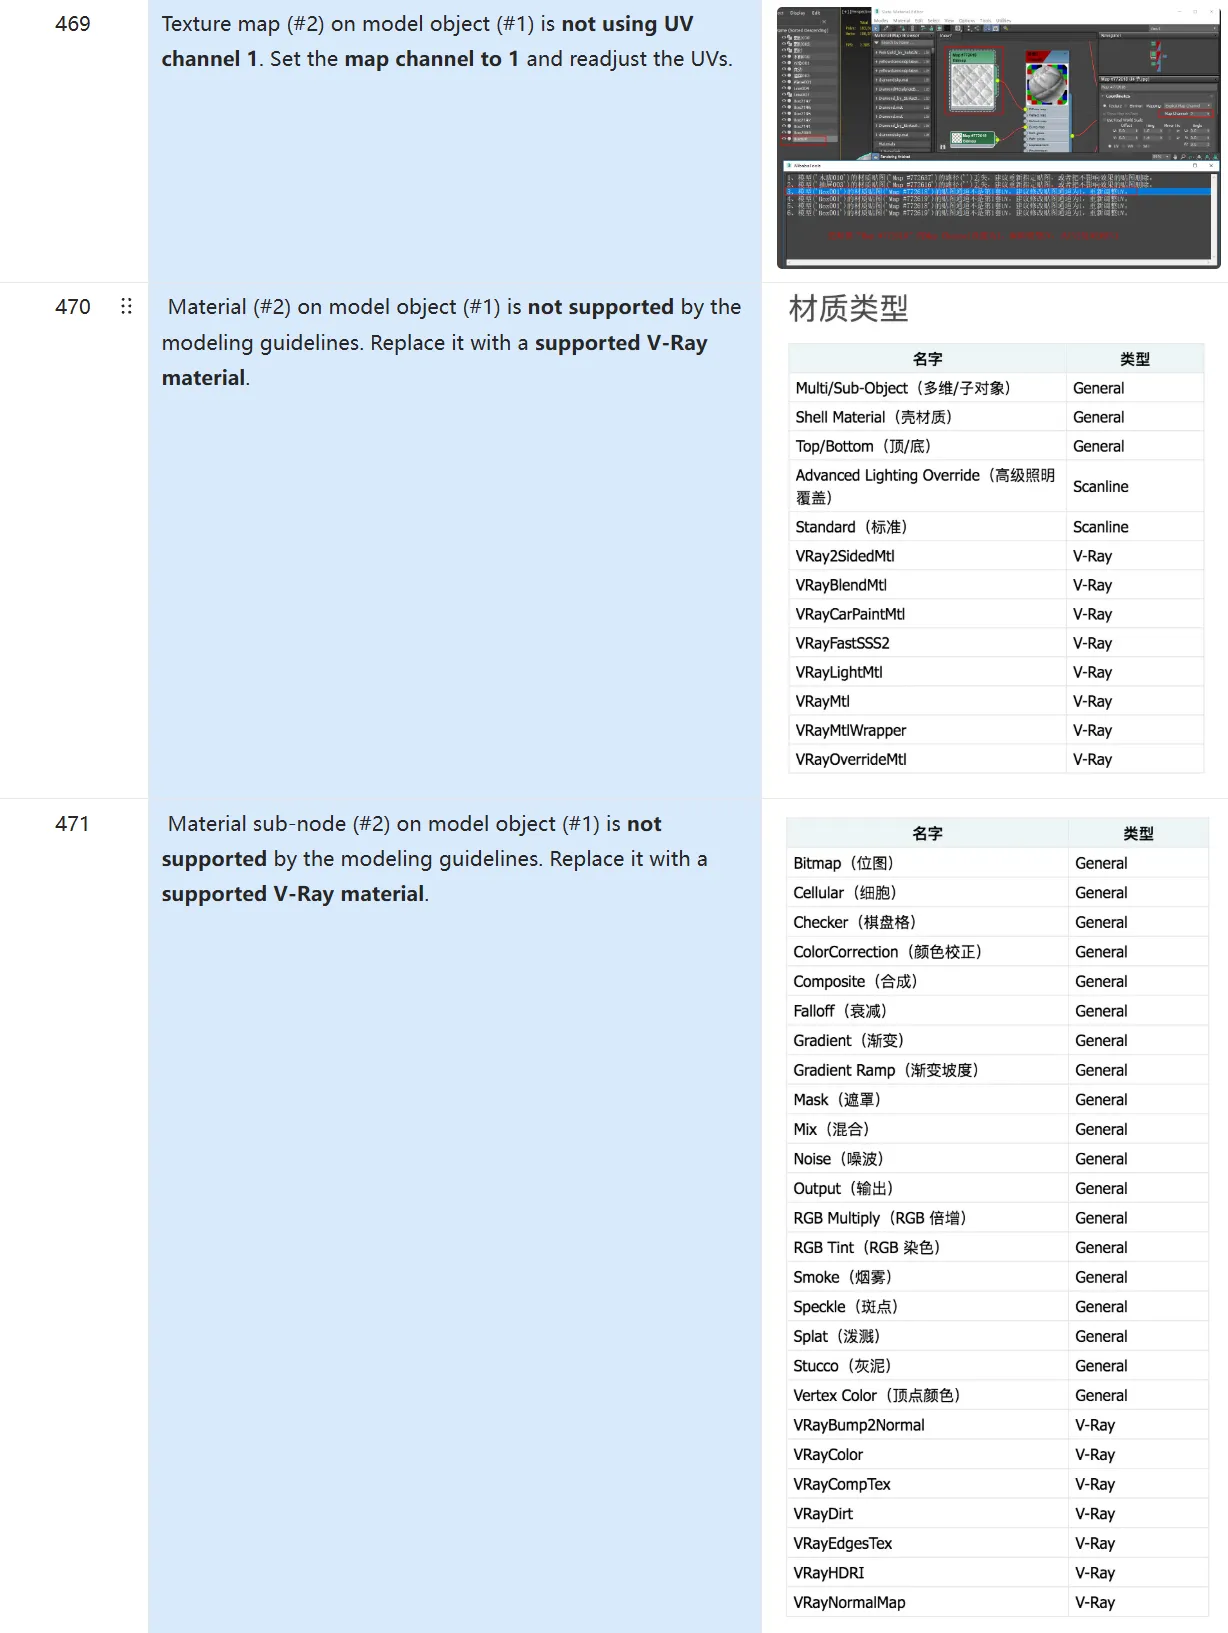
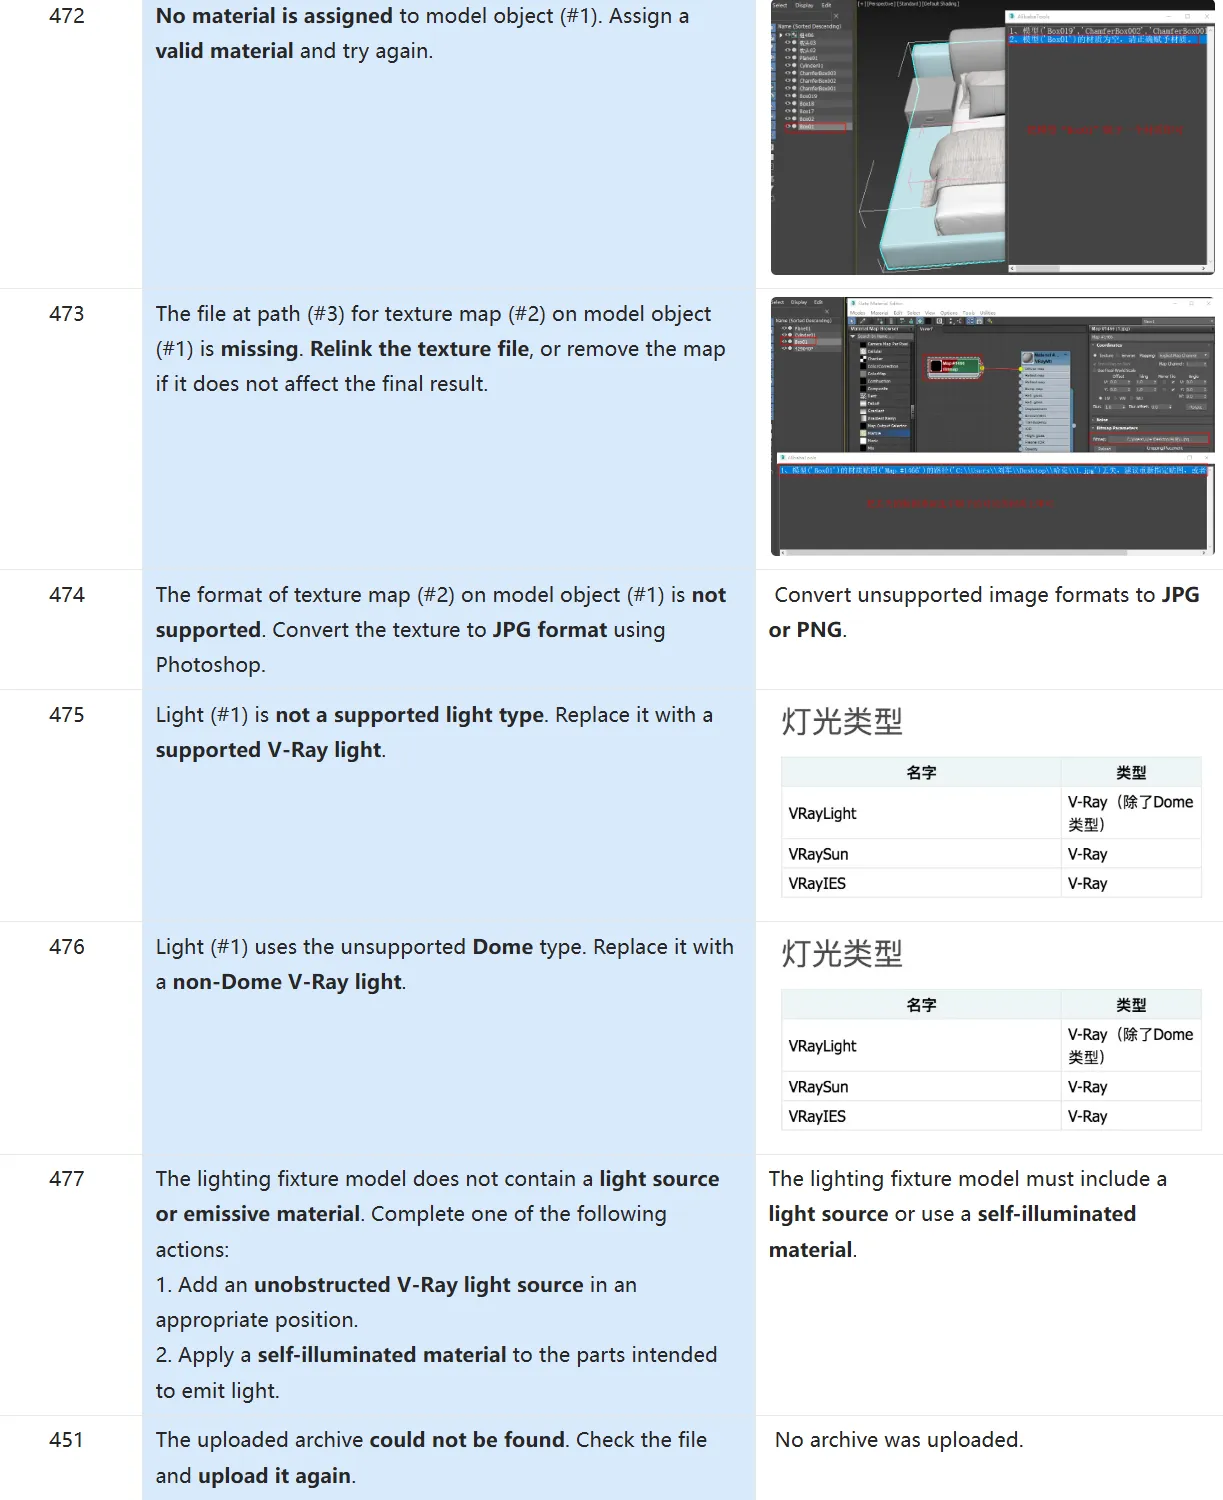
If an Error Code appears, see [7. Model Upload Error Messages and Solutions] to find the corresponding cause and solution.
6.1 File Size Exceeds the Limit
Check whether:
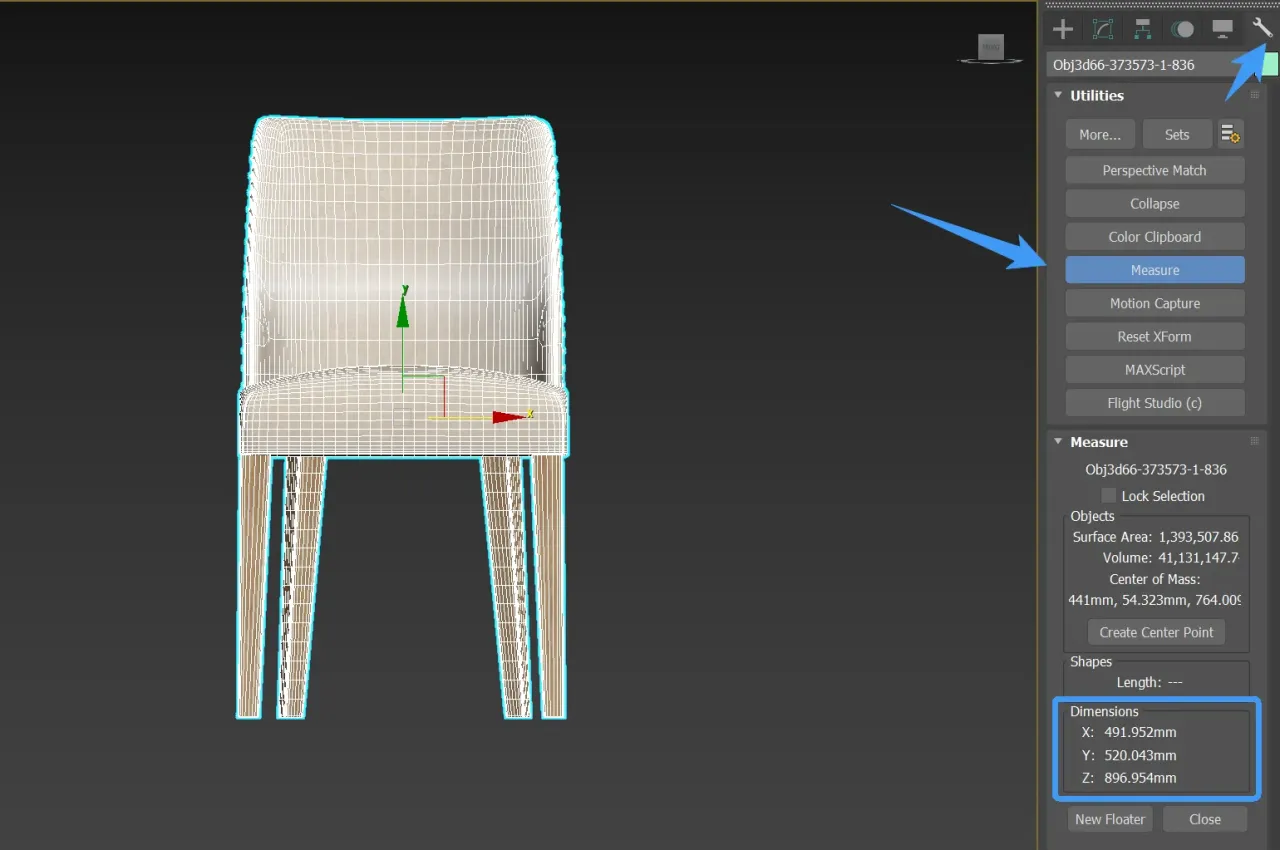
·The file size exceeds 200 MB;
·The model's length, width, or height exceeds 20 m;
·The scene contains unrelated or hidden objects.
Remove unnecessary content and upload the model again.
6.2 Unsupported File Type
Supported 3D file formats include:
MAX, RAR, ZIP, GLTF, GLB, SKP, FBX, and OBJ
Convert the file to a supported format before uploading it again.
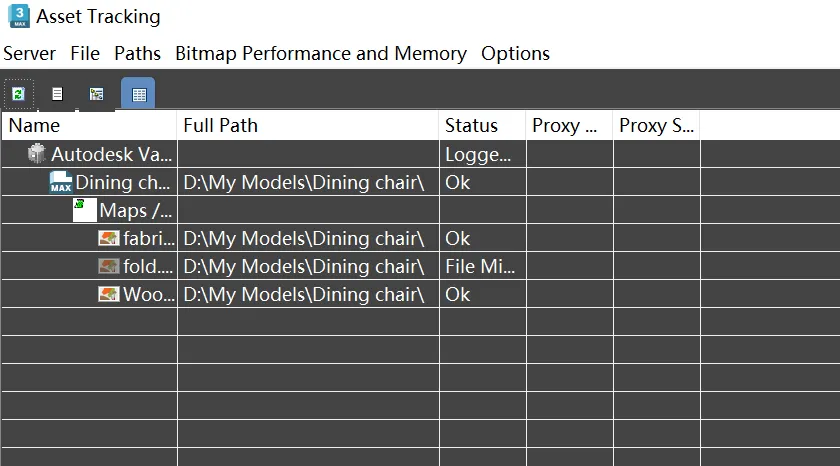
6.3 Missing Model Textures
In 3ds Max:
·Check all textures used by the model;
·Press Shift + T to open Asset Tracking;
·Relink or remove any missing textures;
·Archive the model and textures again, then upload the file.
6.4 Model Exceeds the Polygon Limit
The model must not exceed 5 million triangles (approximately 2.5 million quadrilaterals).
If the model exceeds the limit:
·Remove unrelated or hidden objects;
·Remove invisible internal geometry;
·Reduce the subdivision level used by TurboSmooth;
·Remove unnecessary accessories.
6.5 Incorrect Material Colors
Check whether Gamma is set to 2.2 in 3ds Max.
If Gamma is set to 1.0, change it to the correct value, review the material appearance, and upload the model again.
6.6 Lighting Model Does Not Contain a Light Source
Lighting models must contain at least one light source or use an emissive material.
Add the required light source or emissive material, then upload the model again.
6.7 MAX File Does Not Contain Model Geometry
Open the MAX file and confirm that the required model geometry is present and visible.
6.8 Too Many Objects
A single model can contain no more than 500 objects.
Merge related objects until the total is within the supported limit, then upload the model again.
7. Model Upload Error Messages and Solutions
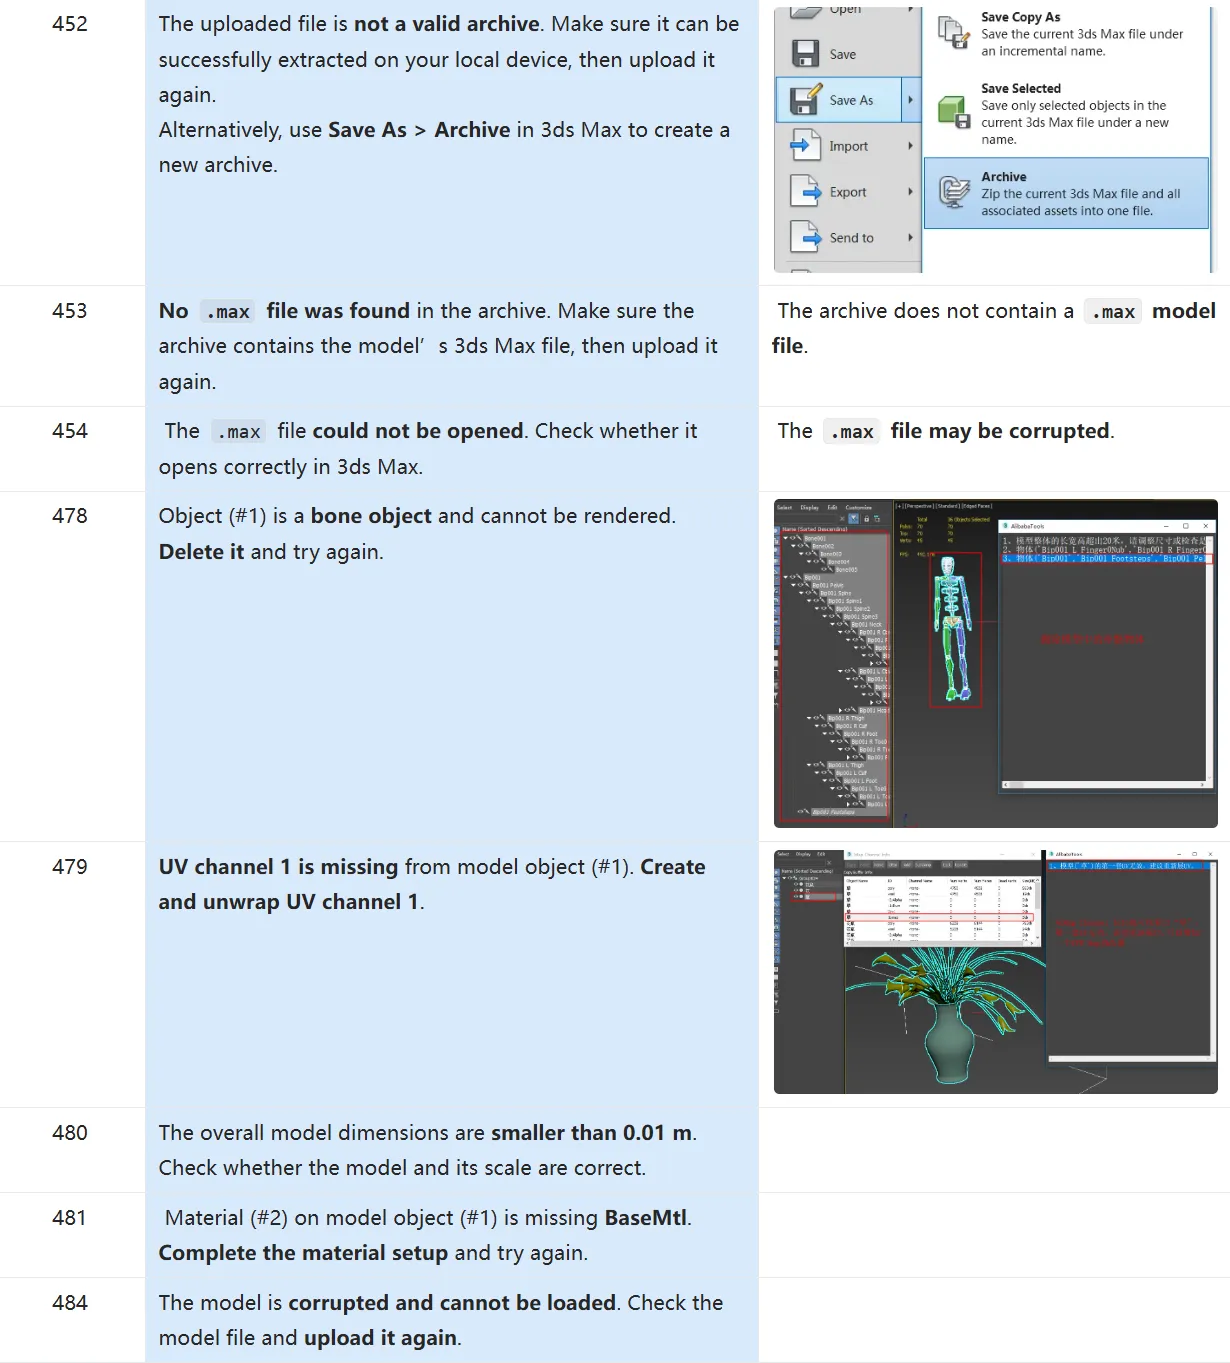
For model upload errors and their solutions, refer to the table below.