
Updated Functions:
1.【General Features】
1.1【Function】Added automatic wainscot models
1.2【Function】Measurement tool supported in 3D and roam views
1.3【Function】Supported setting door pocket for single side
2.【Custom Furniture】
2.1【Custom Furniture】The new custom furniture just got launched!
In Custom Furniture, you can design cabinets, closets, shelves and other furniture easily. Various components and parameters give you flexibility in designing custom furniture.
3.【Interior Modeling 2.0】
3.1【Interior Modeling 2.0】Added group list to manage faces and models efficiently
3.2【Interior Modeling 2.0】Supported automatic grouping after using the array function
3.3【Interior Modeling 2.0】Supported 3D text wrapping input, and now can be moved and rotated flexibly
4.【Rendering&Video】
4.1【Render】Panorama added 4K resolution and can be redeemed with points
4.2【Render】Supported to upload your own 2:1 image and covert it into a spherical image as the environment for rendering
4.3【Render】Supported adding text and images in the panorama editing
4.4【Render】Supported deleting images in the preview window of the design interface
4.5【Video】Supported video setting of depth of field effect
4.6【Render-Member Exclusive】Render retouch supported to save the edited image as a new image
4.7【Render-Member Exclusive】Render retouch added crop in free size
Detailed Introduction:
1.【General Features】
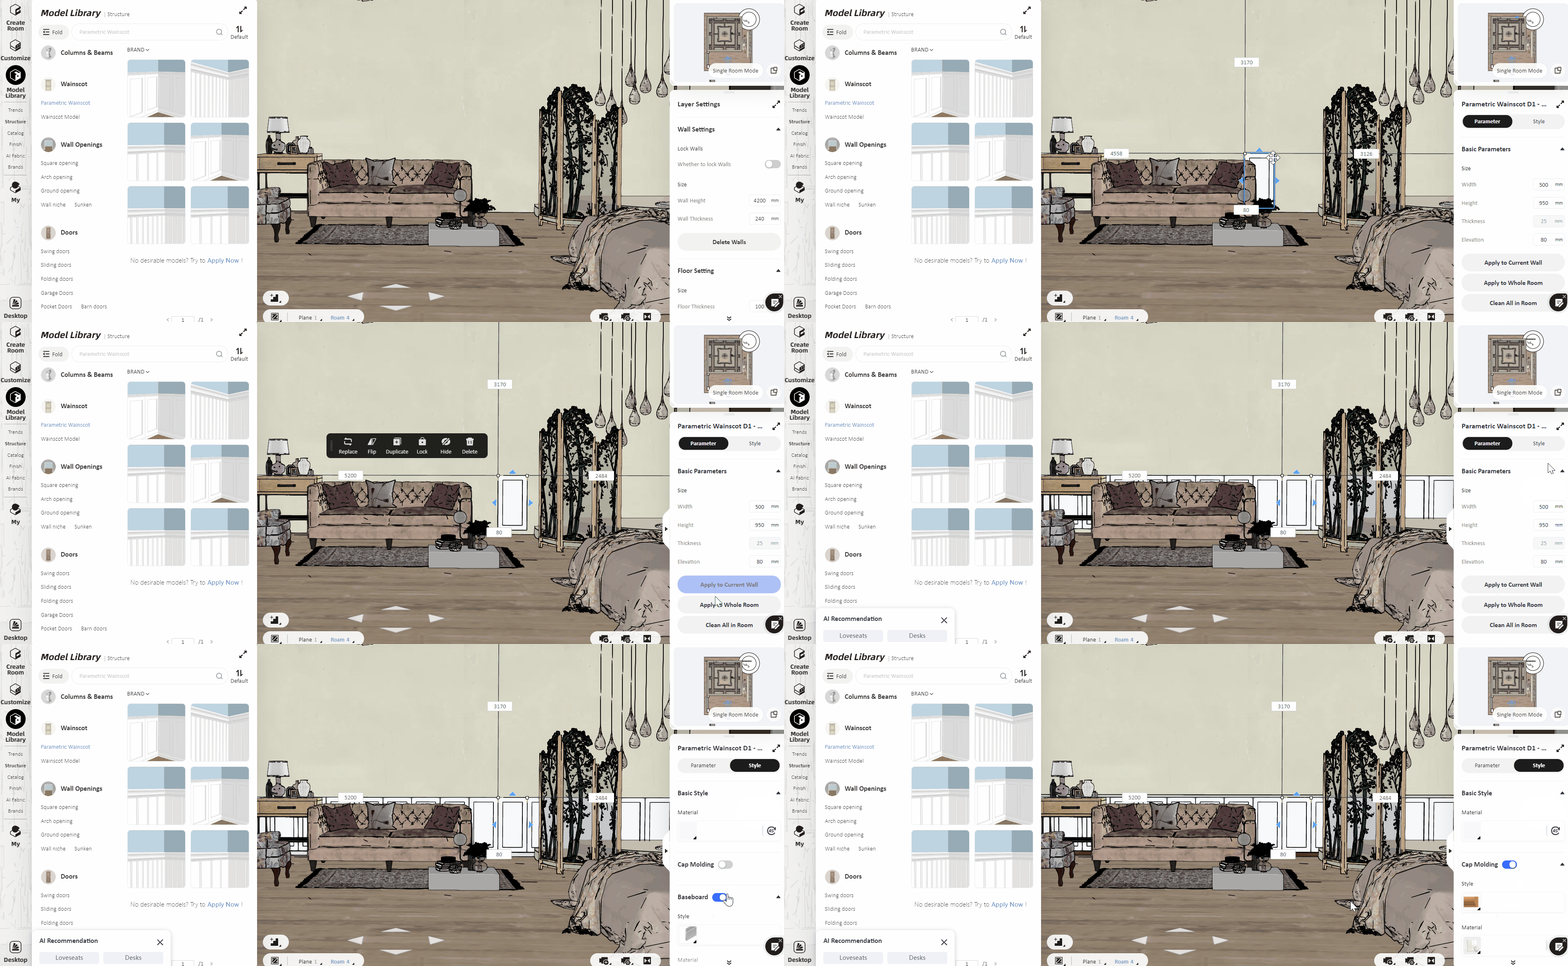
1.1【Function】Added wainscoting model
In design, we always use wainscoting for wall design. A new catalog of wainscot models has been added to the Model Library-Structure. You can choose between the normal or parametric types of wainscot models. Simply drag a single wall panel in the design, quickly adjust the parameters and generate Cap Molding and Baseboard in the right property panel. Then you can also apply the edited wainscot to the current wall or whole room by simply clicking the button in the bottom right corner.
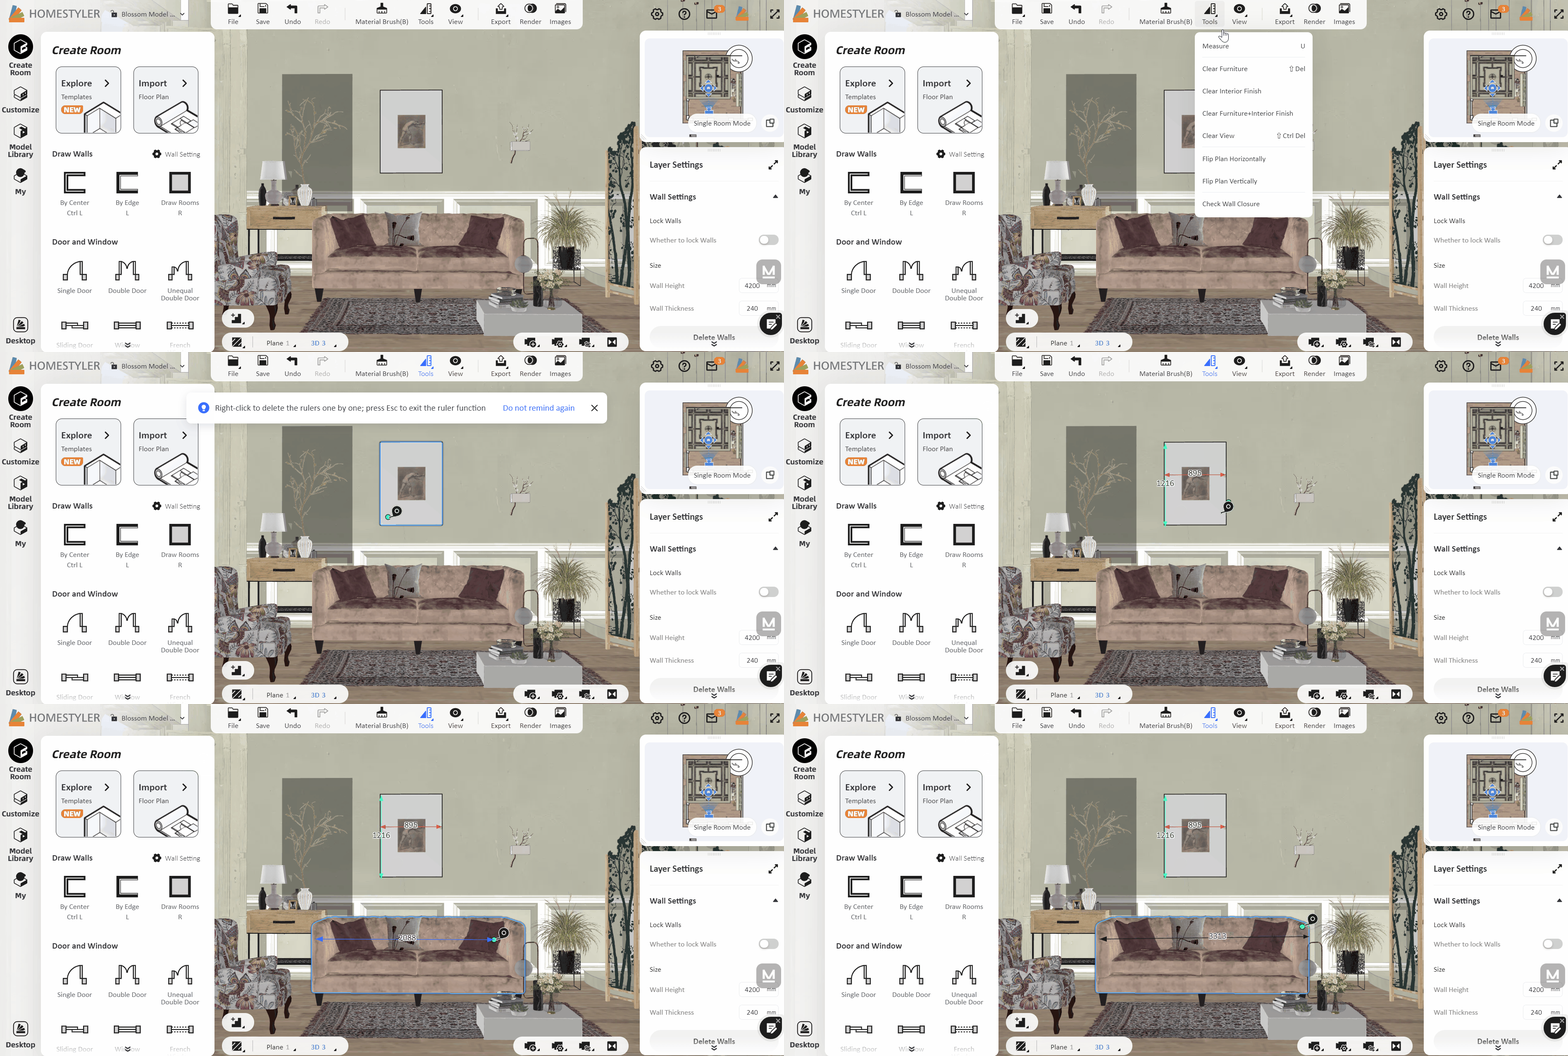
1.2【Function】Measurement tools supported in 3d and walkthrough views
Switch to 3D/Roam view in the design interface and click "Measure" in the tool. You can also mark multiple dimensions at the same time for reference without exiting the measurement function.
1.3【Function】Supported setting single side door pocket
After placing the door model, you can now set up different door pockets in the style interface on the right. Unlike previously you can only turn on or off the pocket option, you can now determine which side of the wall to apear with the pocket, so it can help us create some indoor invisible door type.

2.【Custom Furniture】
The new custom furniture just launched!
In Custom Furniture, you can design kitchen cabinets, closets, shelves and other furniture easily. Various components and parameters give you flexibility in designing custom furniture.
*Note: Please be aware that the custom furniture function does not support the multi-floor for the moment. If you have multi floors or a basement in your design, you will not be able to enter the Custom Furniture environment, nor further edit the cabinet you built.
1.Where to enter the Custom Furniture (beta)?
You can enter it through the Cutstomize catalog on the left.
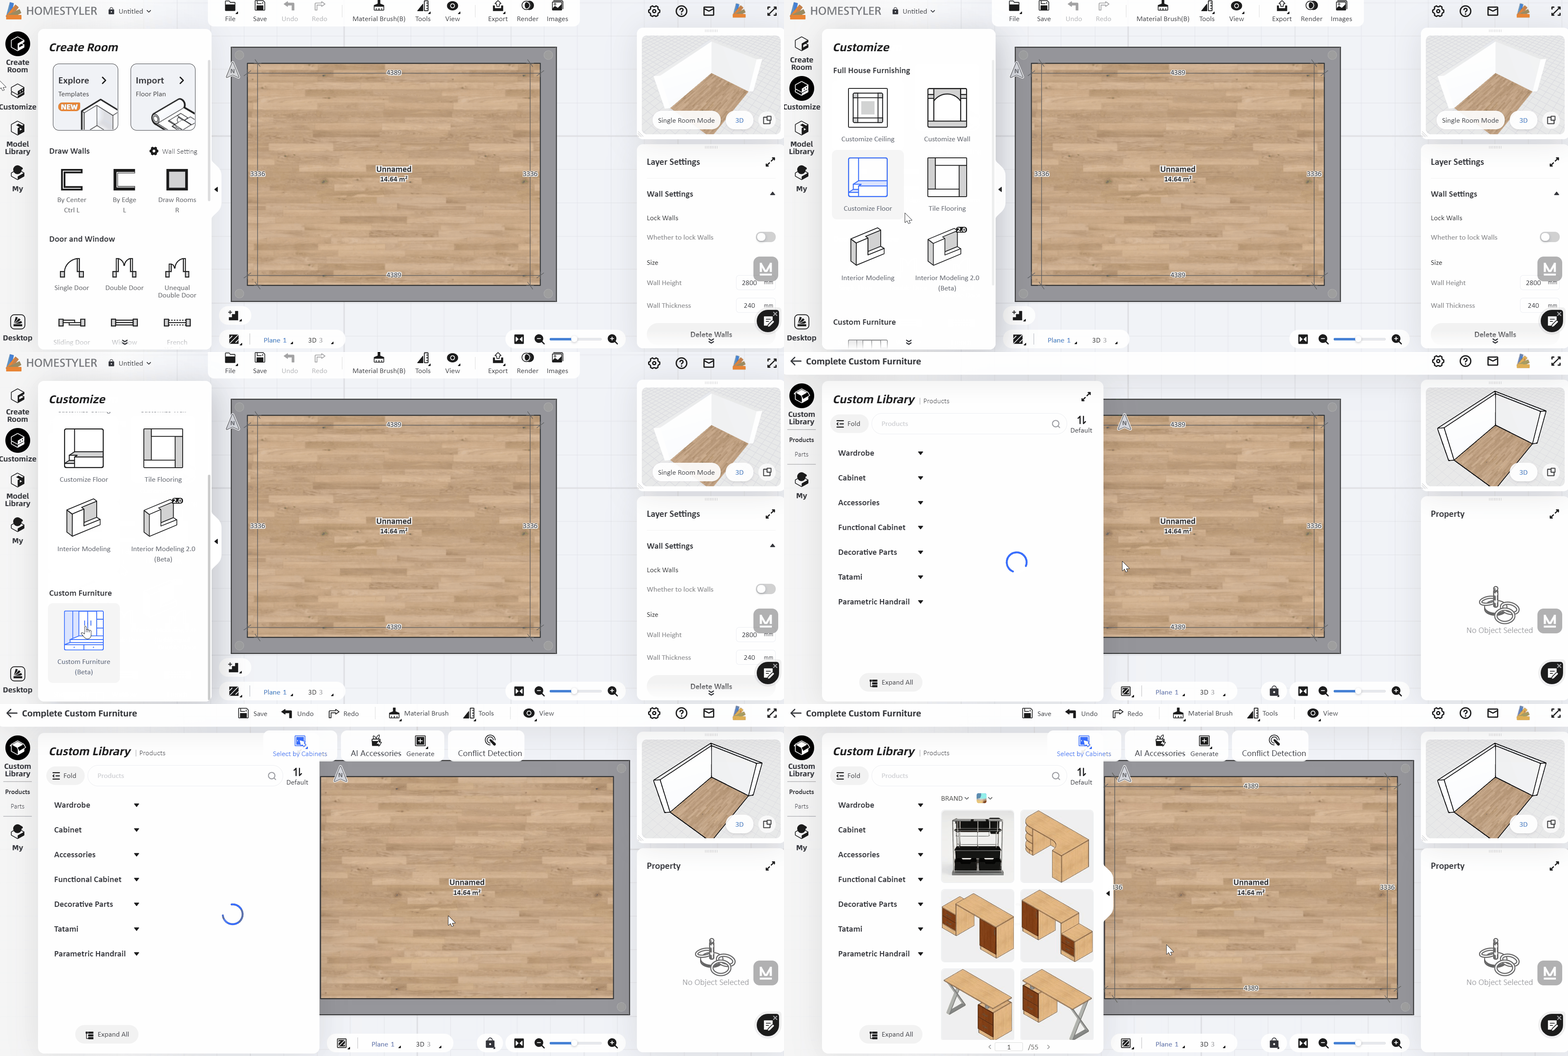
2.How to design custom furniture?
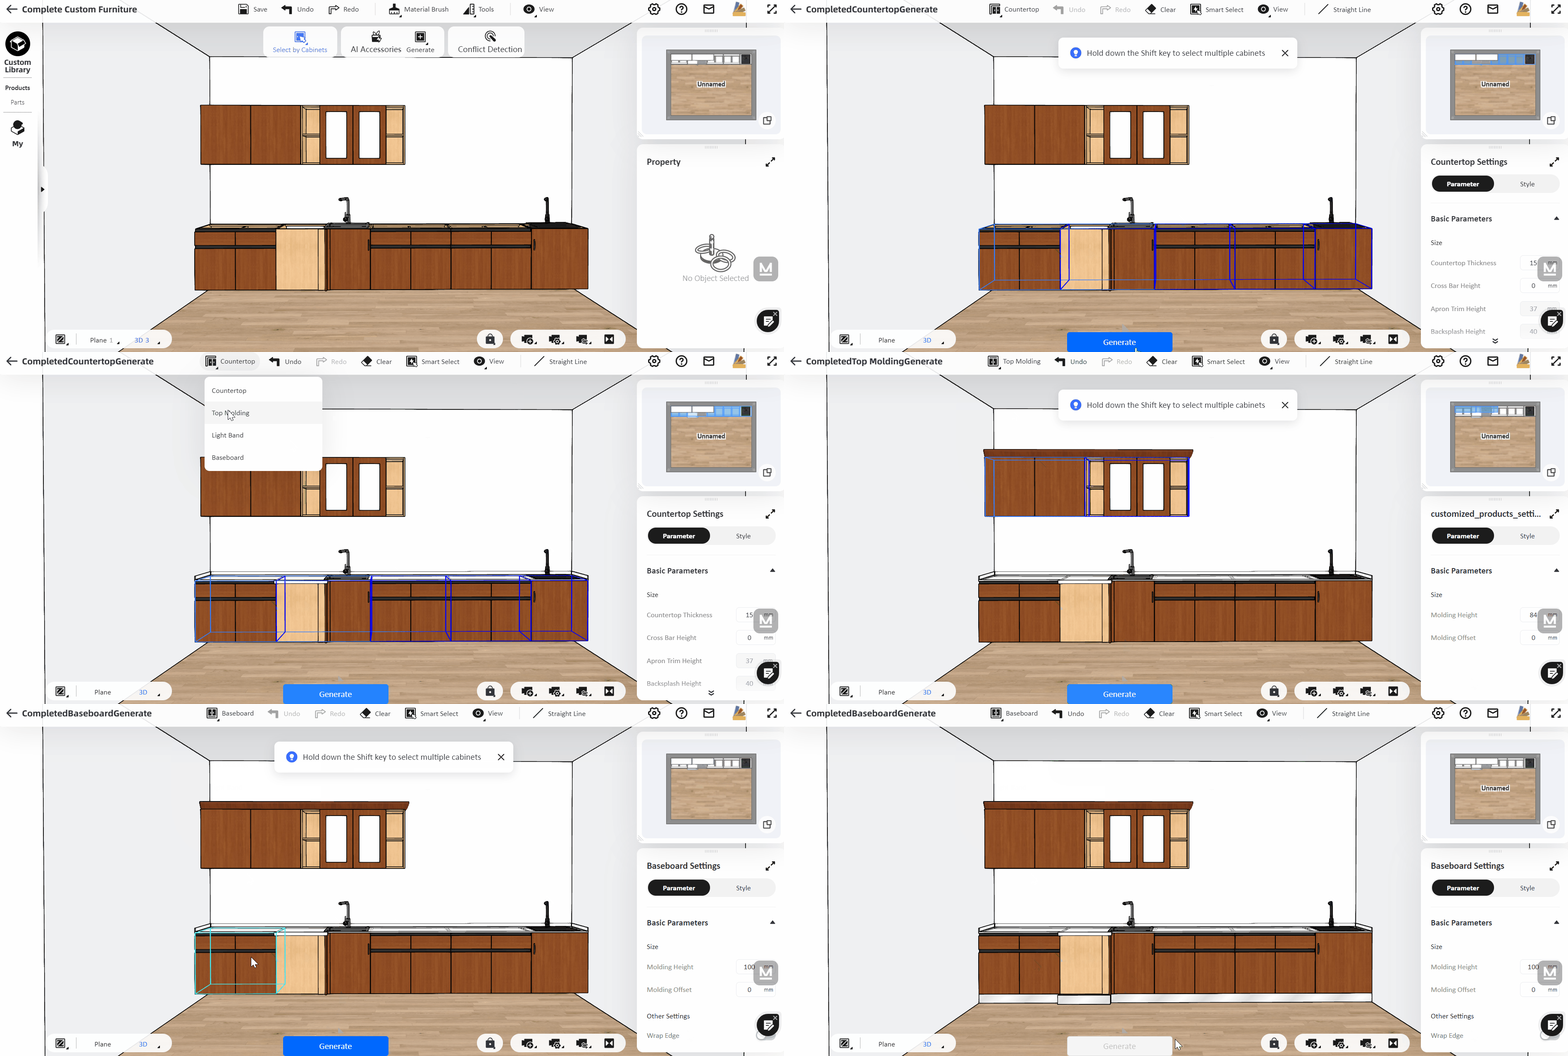
Let us take a kitchen cabinet as an example. Choose between the products and parts catalog on the left to form the general layout, from the base unit, to the wall unit and also the cabinet with sinks, etc.
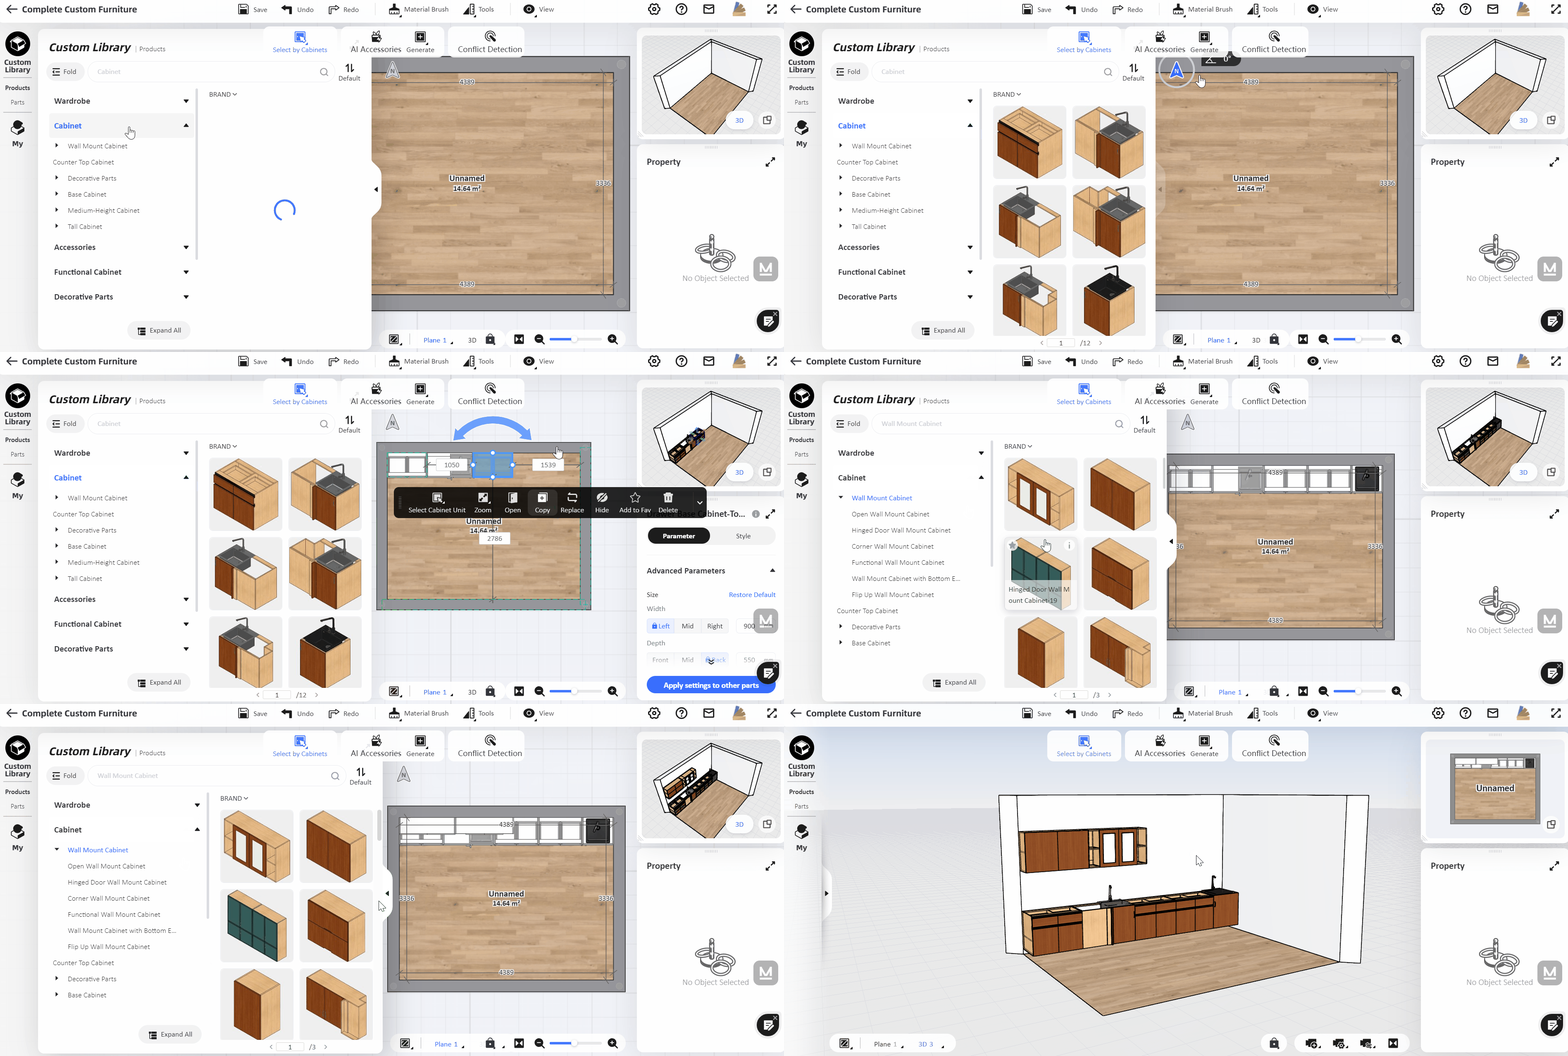
3.How to generate countertop, top molding and baseboard for a cabinet?
After designing the layout, you could generate the countertop, the top molding or the baseboard for the cabinets. You can also adjust the styles and materials of these countertops and moldings.
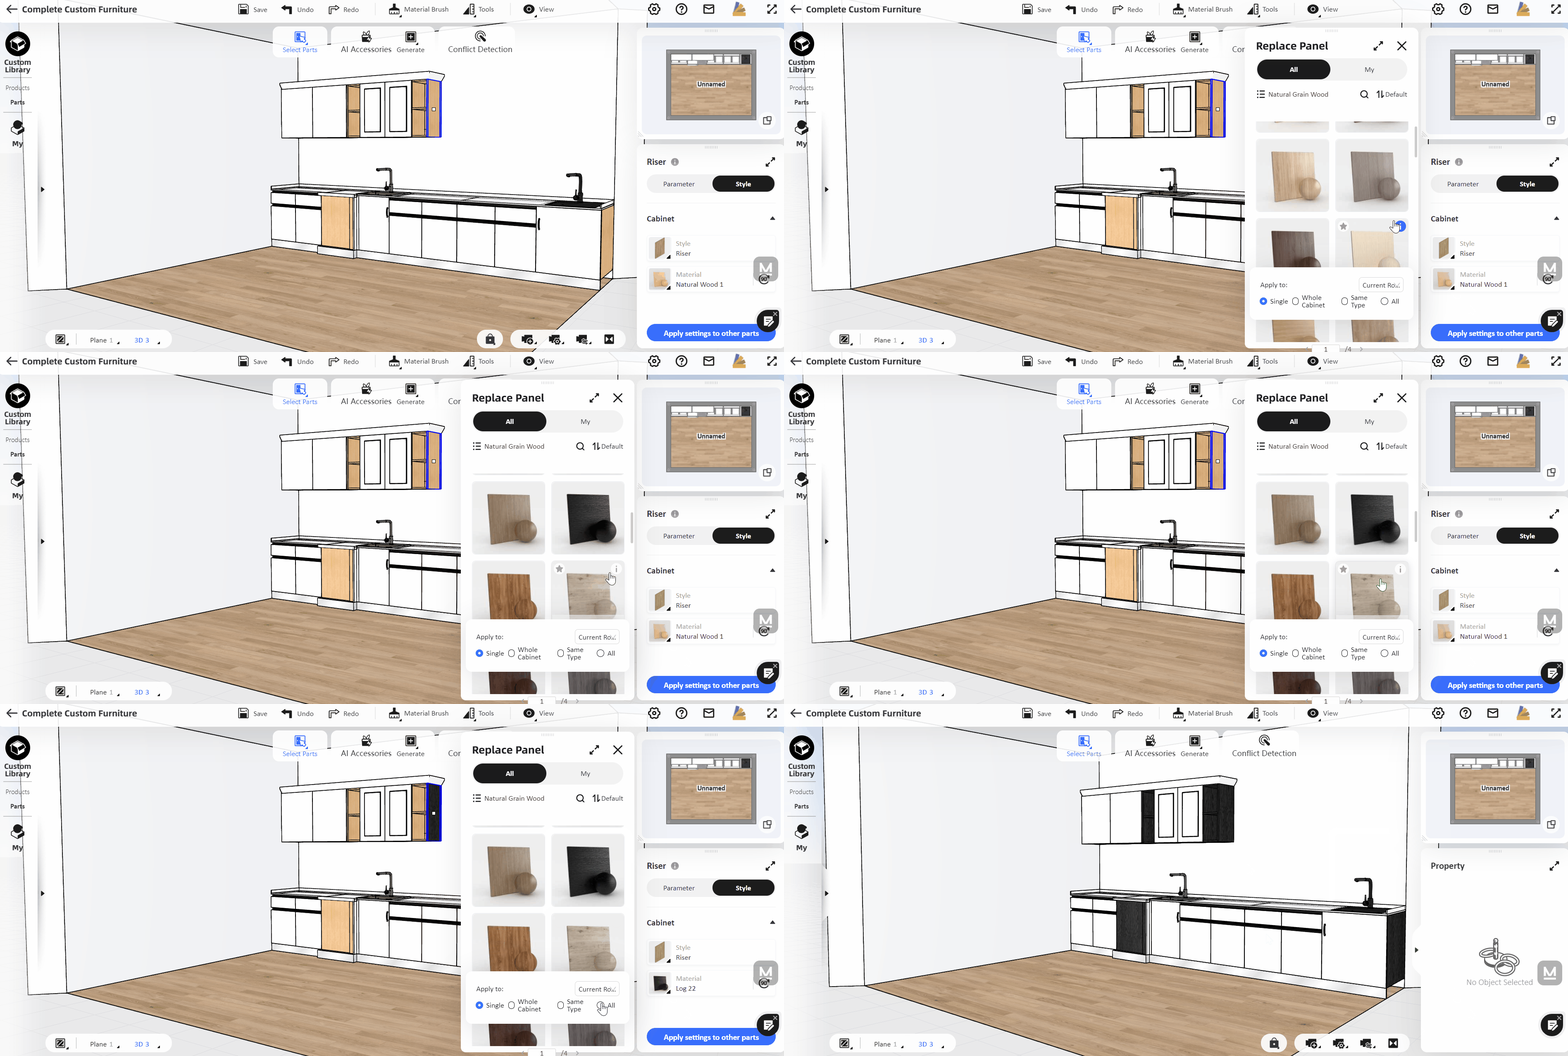
4.How to adjust the parameters of the cabinet and door?
For each custom model, you can adjust the parameters on the right. You could double-click to enter a model and select each panel and board.
3.【Interior Modeling 2.0】
3.1【Interior Modeling 2.0】Added model grouping list
The group list function allows you to manage lines, faces and combinations of shapes efficiently. And you can quickly rename, hide, and categorize these modeled shapes. After drawing a shape in the Interior Modeling interface, you can view all the faces of the shape and the grouped shapes in the "Group List" on the right side.

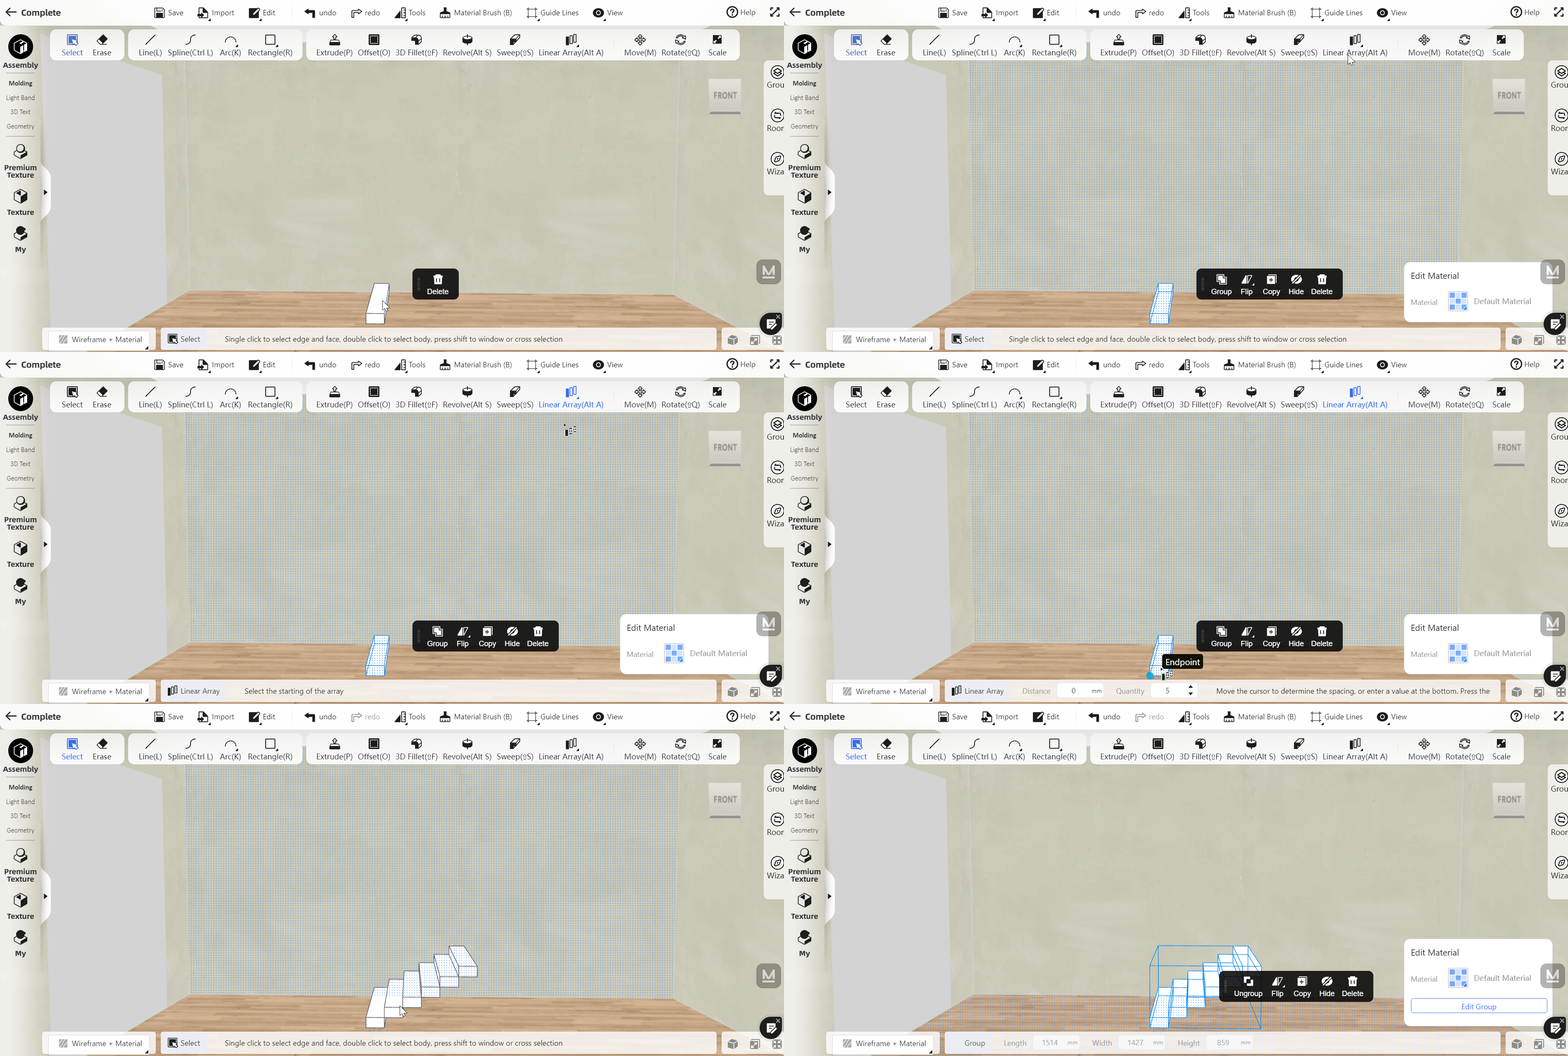
3.2【Interior Modeling 2.0】Supported automatic grouping after using the array function
Array function is a common function in modeling. However, previously we have to regroup the models after each use. This update will automatically group all the models after the array, which make it more convenient.
3.3【Interior Modeling 2.0】Supported 3D text wrapping input, and move and rotate freely
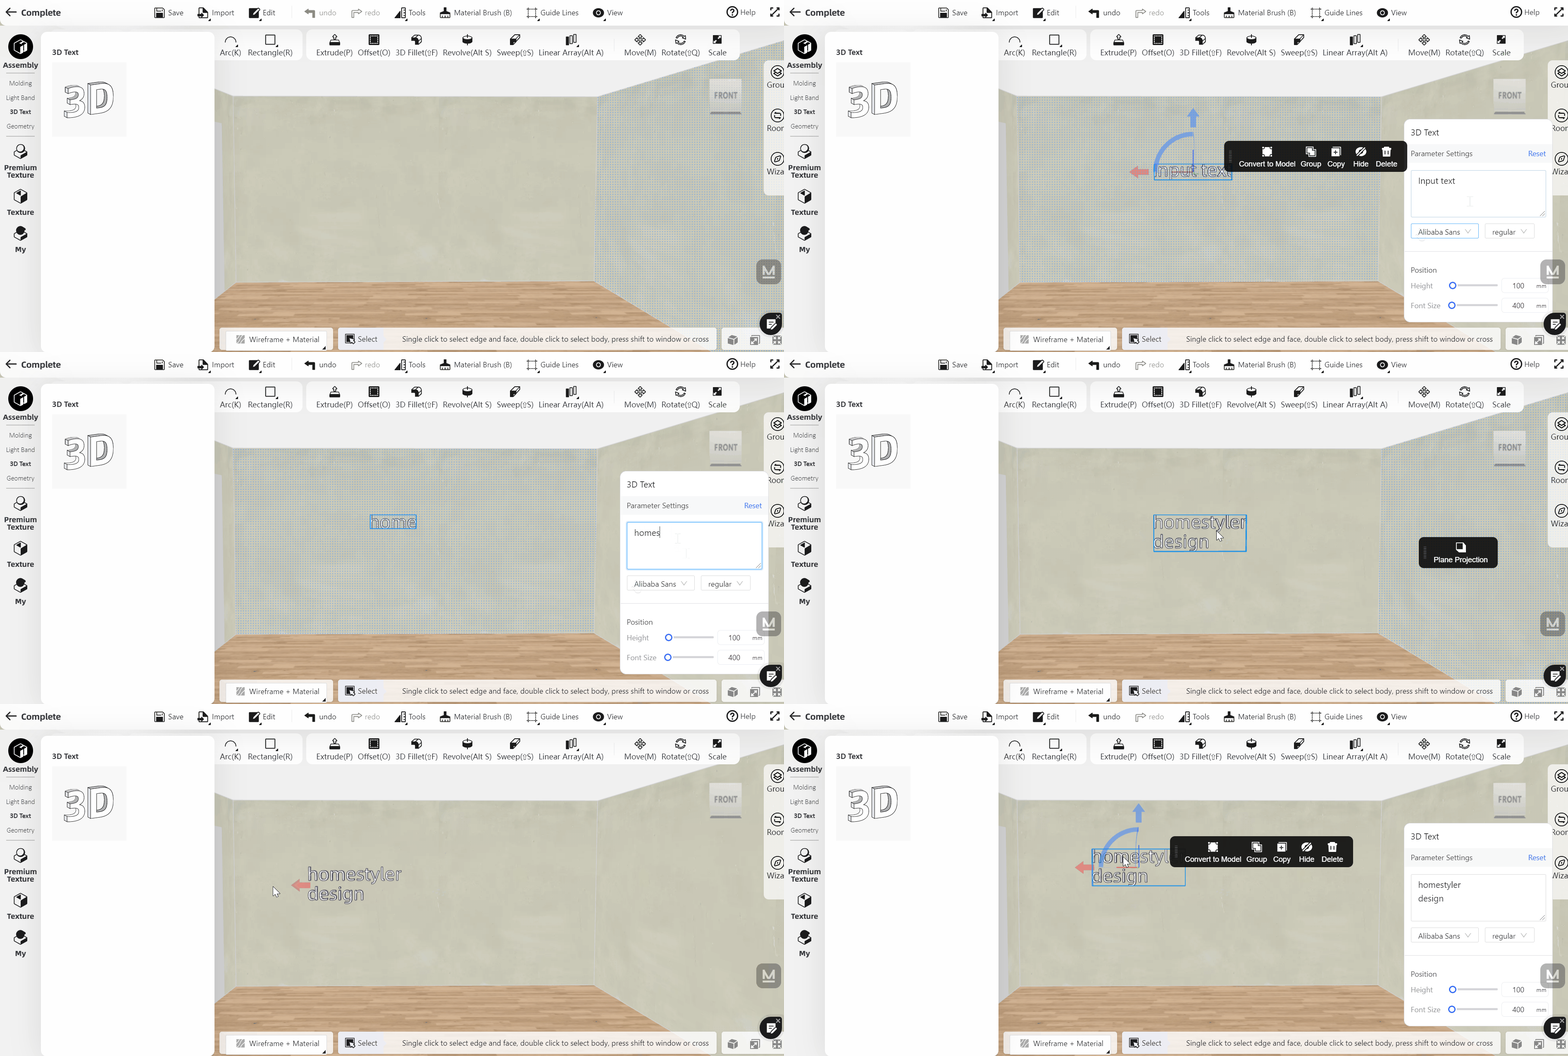
When editing and inputting 3D text, the 3D text in the program can be synchronized with line feeds in the right input box (you can press "Enter" to start a new line). This function can solve the needs of different text arrangements. After selecting the 3d text, you can drag three axes to rotate and move it like other furniture models.
4.【Rendering&Video】
4.1【Render】Added panorama 4K resolution rendering
Panoramas added 4k resolution. You can go to "Render-Panorama-Settings" to render, and it can be redeemed with Homestyler points. Pro or Master members also gets free quota for 4K panorama.

4.2【Render】Supported the conversion of the uploaded location image into a spherical image
Enter "Render-Enviroment-My" and upload a picture with an aspect ratio of 2:1. The system then converts it into a spherical image without seams, which can make the rendering more natural and realistic.

4.3【Render】Supported adding text and pictures in panorama
Panorama is now upgraded! You can add text descriptions for your design in the panorama and even add your rendered images to better depict your design concept with the panorama.
After rendering the panorama, enter the panorama editor. Select "Tag", then select "Set Image & Text Tag", and then adjust the label position.


Finally, you can see the graphic information displayed when you open a new window to browse the panorama.

4.4【Render】Supported for deleting pictures in the image window of the design interface
We added a shortcut mode to delete the rendered images. Renders now can be deleted by hovering over the image/album icon in the design interface and then clicking the trash.

4.5【Video】Supported video setting depth of field effect
The depth of field effect can make the picture more spatial, increase the contrast between reality and fiction, and make the effect more realistic. Enter the advanced mode of the video rendering function, and turn on the "Depth of Field Effect" on the right. Once you scroll down the interface, you can manually adjust the "Depth of Field Effect".

4.6【Render-Member Exclusive】Supported edited image to save as
Enter the Render Retouch environment by clicking "edit image" of the render, and then edit renders with different properties. The edited image now can be saved as a new one istead of overwriting the original one.

4.7【Render-Member Exclusive】Edit image to add free crop function
Enter the Render Retouch environment by clicking "edit image" of the render, then you can crop the rener in free proportions as you wish.


