Dear Homestylers, it's been a while since our last update. The new Homestyler V4.0 was just launched on 31st August, 2021.
Here is the introduction to all the optimizations and new features:
design
1.【General Features】
1.1【Interface】Upgraded the brand new User Interface
1.2【Interface】New entry for Preferences & Measurement Unit setting
1.3【Interface】Updated the "Beginner's Guide"
1.4【Interface】Added side menu bar to enable faster model searching
1.5【Interface】Added transparent wireframe mode setting
1.6【Interface】Supported function panel customization
1.7【Interface】Optimized category structure in the replacement panel
1.8【Function】Updated Interactive Fabric to simulate fabric effect
1.9【Function】Added elevation view in the design interface
1.10【Function】Wall opening and niche increased arch height adjustment
1.11【Function】Models added related category recommendation
1.12【Function】The model information added Model ID
1.13【Function】Models supported alignment in 9 ways
1.14【Function】Model supported horizontal or vertical distribution
1.15【Function】Model supported scaling by dragging
1.16【Function】Model supported exact and fast copy with shortcut
1.17【Function】Supported customized and separate display of hidden items
1.18【Function】Supported applying current materials to the same models
1.19【Function】Window sill width supported width setting
1.20【Function】Models in "My Fav" can be deleted or moved in batches
1.21【Function】Models in "My Fav" supported to be searched
1.22【Function】The 3D view supported to use the"space bar" to rotate the view angle
design
2.【Interior Modeling 2.0】
2.1【Interior Modeling 2.0】Supported to switch rooms or display all rooms
2.2【Interior Modeling 2.0】Customized model supported independent editing
2.4【Interior Modeling 2.0】Added scaling tool to customized models
2.5【Interior Modeling 2.0】Left click to evoke the menu bar
2.6【Interior Modeling 2.0】Newly added geometric model
2.7【Interior Modeling 2.0】Added eraser function
2.8【Interior Modeling 2.0】Added three-point arc drawing function
2.3【Interior Modeling 2.0】Supported to apply materials to customized models while modeling
2.9【Interior Modeling 2.0】Supported displaying "Sunken Ground" and "Outside Area" areas
design
3.【Tile Flooring】
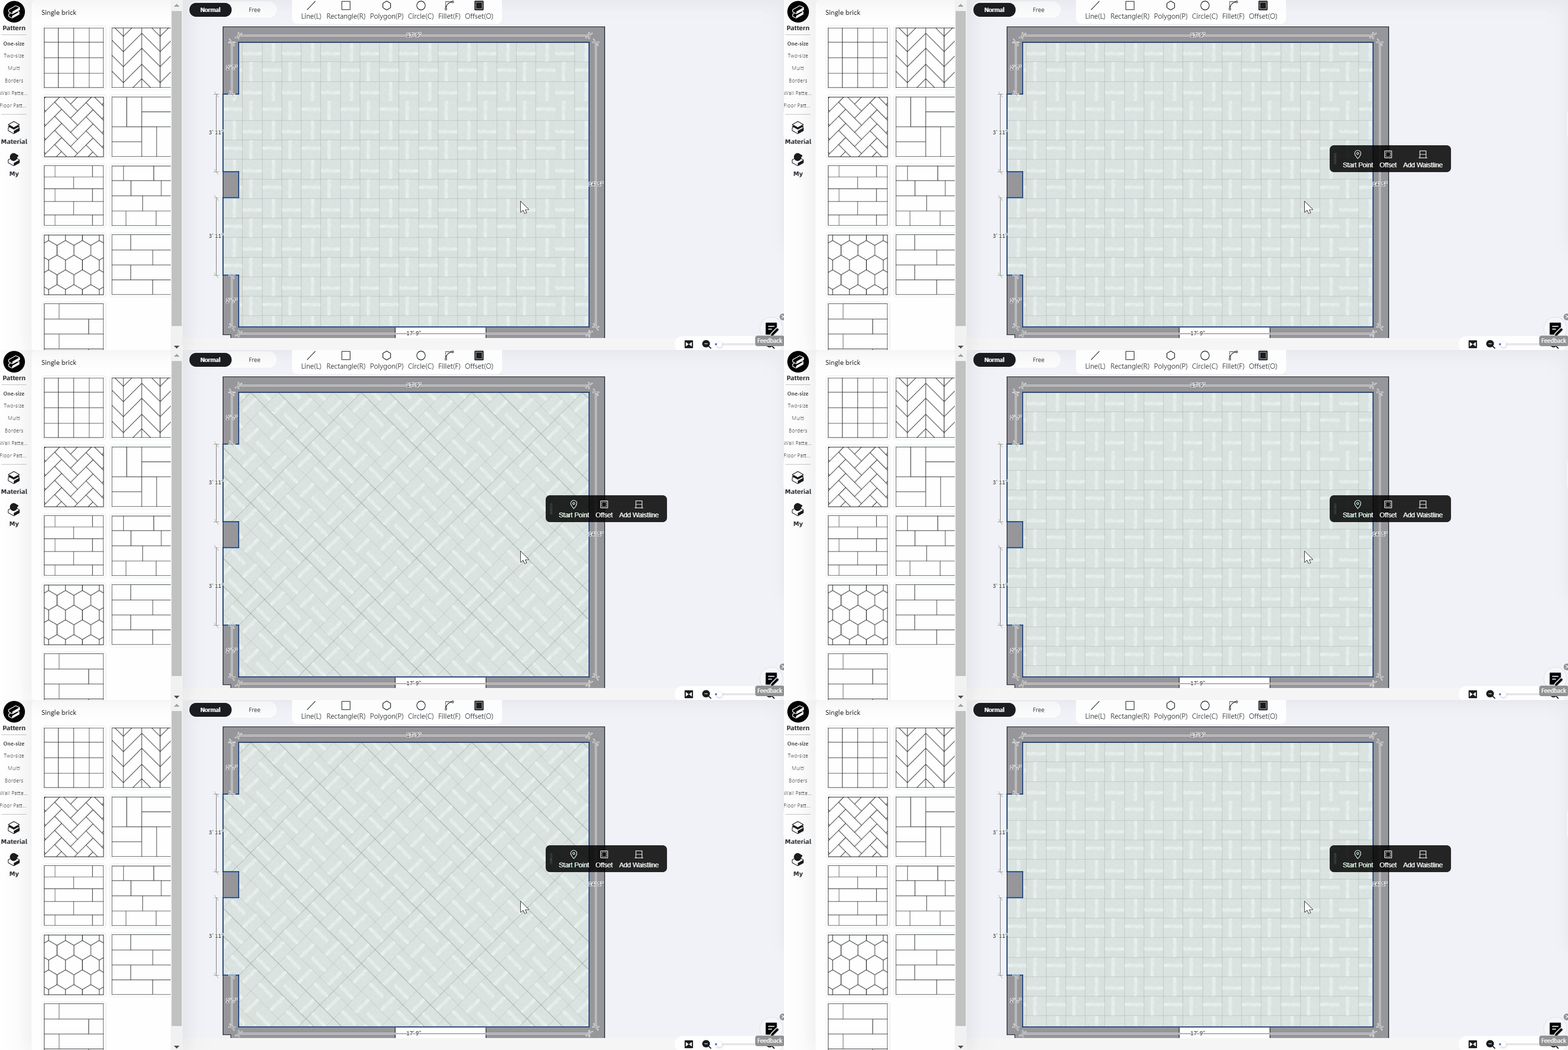
3.1【Tile Flooring】The angle of the floor tiles supports quick rotation by pressing the "space bar" to rotate 45 degrees clockwise each time.
design
4.【Image & Video Rendering】
4.1【Render】Rendered pictures supported "Download Material ID Map"
4.2【Render】Added "Daylight 4.0" intelligent lighting template
4.3【Video】Video resolution added 540p and you can spend Homestyler points for it
4.4【Video】Support directly drawing curved path and straight path
4.5【Video】Video rendering added advanced mode
4.6【Video】The lamps support brightness change animation in video
design
Detailed Introduction:
1.【General Features】
1.1【Interface】Upgraded the brand new User Interface
The era of homestyle4.0 has begun! The concise visual interface, flexible and faster operating experience, and brand-new efficient functions - all these will improve your design efficiency.
Detailed tutorial:https://www.homestyler.com/forum/view/1486267589863034881
1.2【Interface】New entry for Preferences & Measurement Unit setting
Enter homestyler, click the "Settings" button in the upper right corner, select "Preferences"-"Measurement Units" to set the unit. You could also adjust the design operation settings and wall settings in the Preferences window.

1.3【Interface】Updated the "Beginner's Guide"
If you have never used it or are not familiar with Homestyler, after opening the software, click on the "Help"-"Beginner's Guide" in the upper right corner to go through a Beginner's Guide. With a step-by-step instruction, you could easily learn how to get a photo-realistic render!

1.4【Interface】Added side menu bar to enable faster model searching
Click on the "Expand/Fold" icon on the left of the model category, the new side menu bar can clearly display category information and help you find models quickly.

1.5【Interface】Added transparent wireframe mode setting
The transparent wireframe mode can help you clearly see the structural framework and relative relationships of each model.
You can click the material button below (shortcut key: Alt+4) to switch to "transparent wireframe " mode.

1.6【Interface】Supported function panel customization
You can click and hold the drag bar in the function pane to move or adjust the size and position of the panel according to your design habits.

1.7【Interface】Optimized category structure in the replacement panel
When you need to change the model/material, click "Please choose" to select other categories.

1.8【Function】Updated Interactive Fabric to simulate fabric effect
Are you still worrying about rigid curtain when rendering?Are you still busy finding table models with matching table linen?
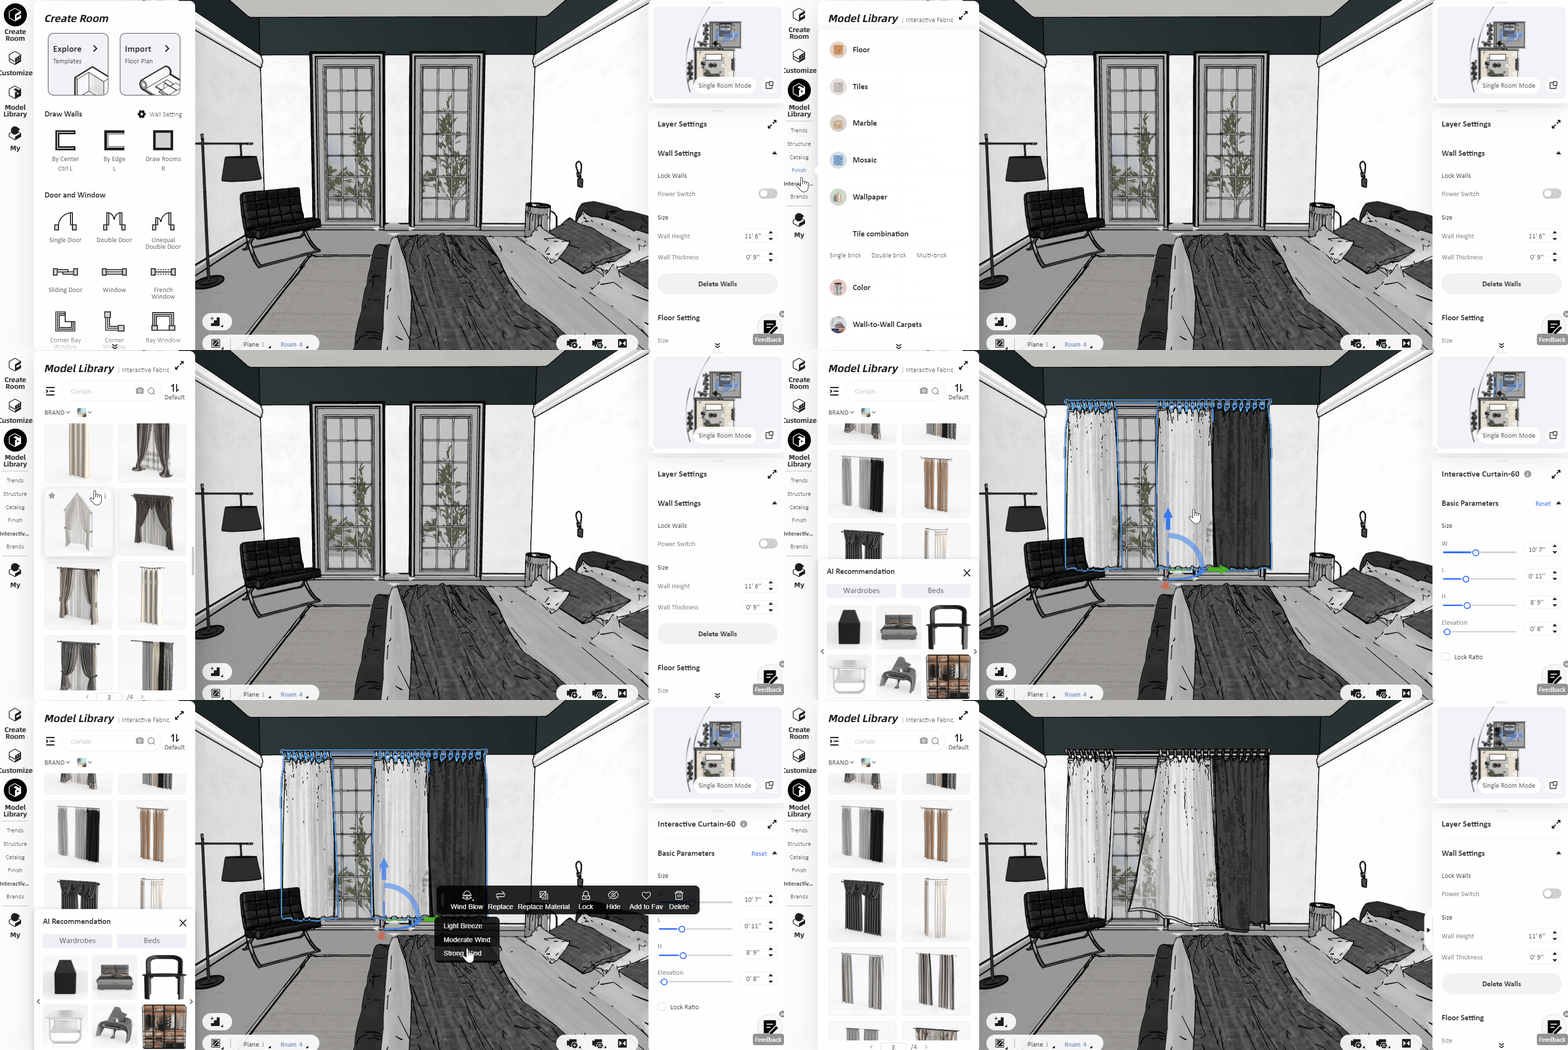
We have prepared the exclusive 「Interactive Fabrics」 (Curtains, Throws, Cushion/Pillows, Bedding, Table Linen) for you. You can place them in a suitable position and we could help make the curtain wave or drop the cloth on furniture!

Take curtains as an example:
Detailed operation:Open the "Interactive Fabrics", place the "Curtain" model near the window, and click the "Wind Blow" button to set the wind force. Eventually, curtains blown up by the wind are automatically generated.
1.9【Function】Added elevation view in the design interface
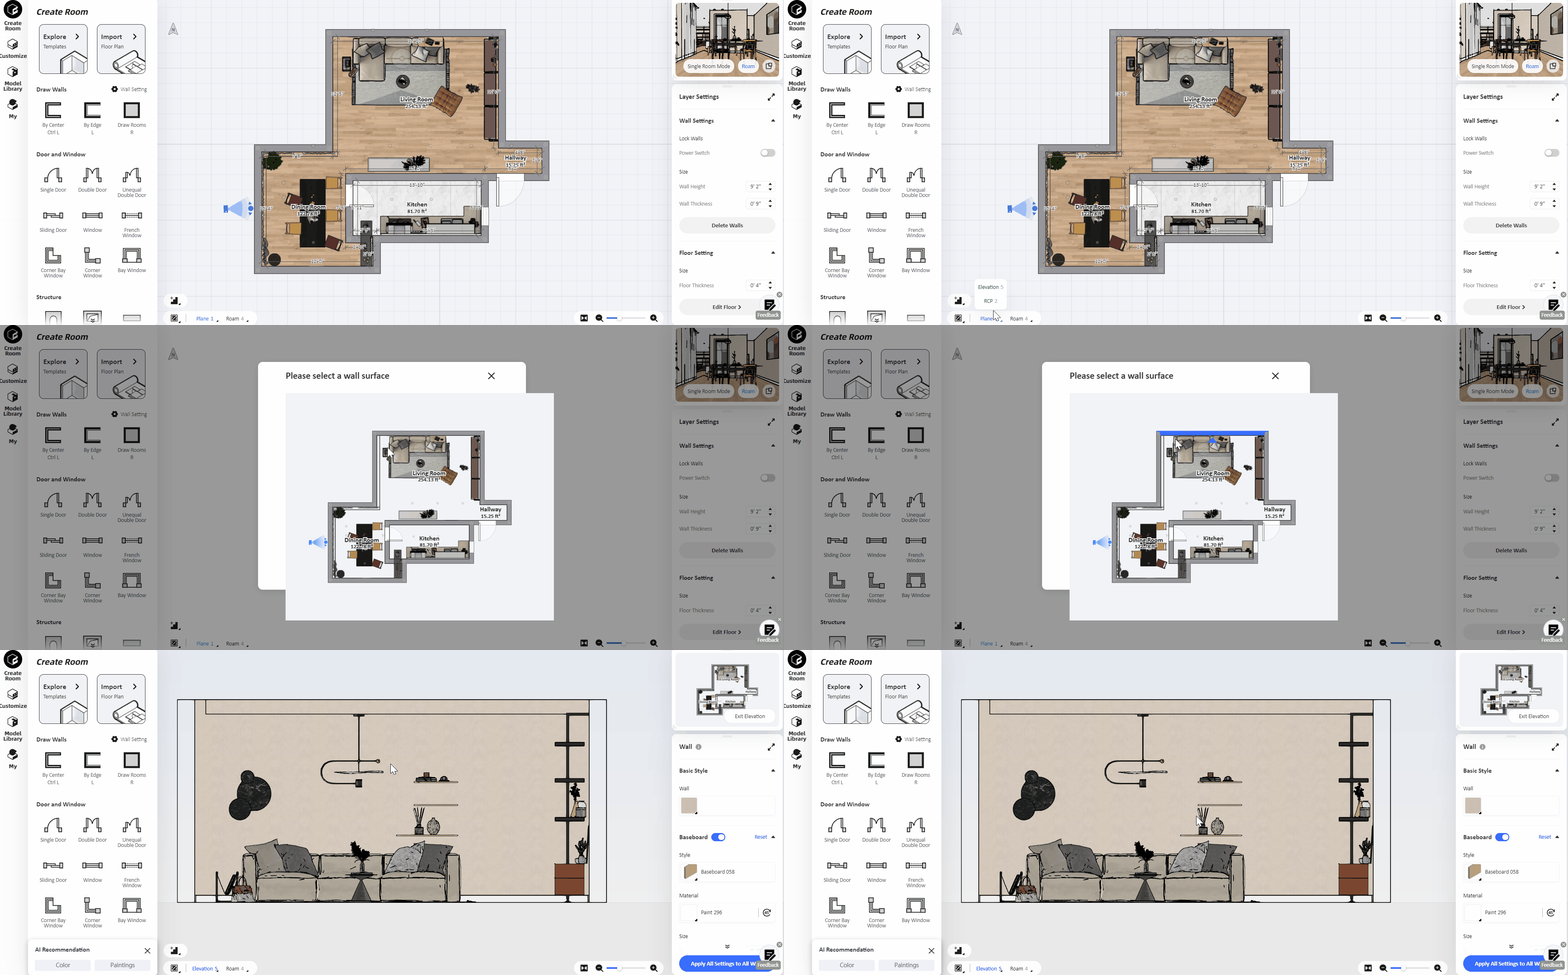
The elevation view can help to make a more detailed design of the wall.
For example, when you add a switch/socket panel to the wall, you can set the current wall to the elevation view, which will be more convenient to operate.
Detailed operation:Select the "Plane" button below-click "Elevation" or use the shortcut key "5" to switch, then select a wall surface to view it as elevation.
1.10【Function】Wall opening and niche increased arch height adjustment
Select the "Door Opening" model and place it on the wall. The default shape of the door opening is a square opening. If you need to change it into an arch door opening, adjust the Arch Height in the right property panel could transfer the top into arc. Similarly, you could also adjust the arch height for the Niche model as well.

1.11【Function】Models added related category recommendation
After selecting any model, the model recommendation window will pop up on the lower-left corner, and you can select the recommended furniture or accessories. The recommendation will be based on the type and style of the model selected, and also the room information where the model is located in.

1.12【Function】The model information added Model ID
Not only can you use model id to quickly search for models, you can also share models with others through model id. At the same time, when there is a problem with the model, you can feedback the model id to the customer service to help you solve the problem faster.
Detailed operation:After selecting the model, move the mouse to the "Information" icon to directly view the model id. If you need to search for a certain model, you can enter the model id in the search box to find it.

1.13【Function】Models supported alignment in 9 ways
First select multiple models by holding the Shift key, left click the “Align” button to select the alignment type, and then click the object to be aligned to.

1.14【Function】Model supported horizontal or vertical distribution
Switch the view to the plane mode (shortcut key: 1), select 3 or more models (hold shift for multiple selections), and then left-click "Distribute", the system will evenly distribute the selected models horizontally or vertically.

1.15【Function】Model supported scaling by dragging
After switching the view to 3D or roam view, select the model that needs to be zoomed, click "move"-"zoom" in the button (shortcut key: Alt/Option+R), and change the size of the model by stretching one of the six arrows.
Note:If the "Scale" button is grayed out, please activate the “Lock Ratio” function of the current model in the right panel first.

1.16【Function】Model supported exact and fast copy with shortcut
In the plan view, select any model and press the Alt or Option key to quickly copy the current model.

1.17【Function】Supported customized and separate display of hidden items
Hidden models add subdivision list. You can choose "View"-"Show Some Hidden Items" at the top to select the models to be displayed separately.

1.18【Function】Supported applying current materials to the same models
First, select a model to "Replace Material". After you finish changing the material, click “Apply Now”in the pop-up window to quickly apply the material to the same model, which reduces repeated operations and improves the design efficiency.

1.19【Function】Window sill width supported width setting
Select window type, click "Window Sill" in "Style Settings" in the right panel, you can modify the width of the window sill A or B side individually.

1.20【Function】Models in "My Fav" can be deleted or moved in batches
Go to "My"-"My Fav", select Favorites, and click " Manage" to move or delete them in batches. You can also perform custom grouping to better manage your model.

1.21【Function】Models in "My Fav" supported to be searched
Open "My" and enter the keywords of the model in the top search box to quickly find it. This search function will be of great help if you have added quantities of models into your Favorites file.

1.22【Function】The 3D view supported to use the"space bar" to rotate the view angle
design
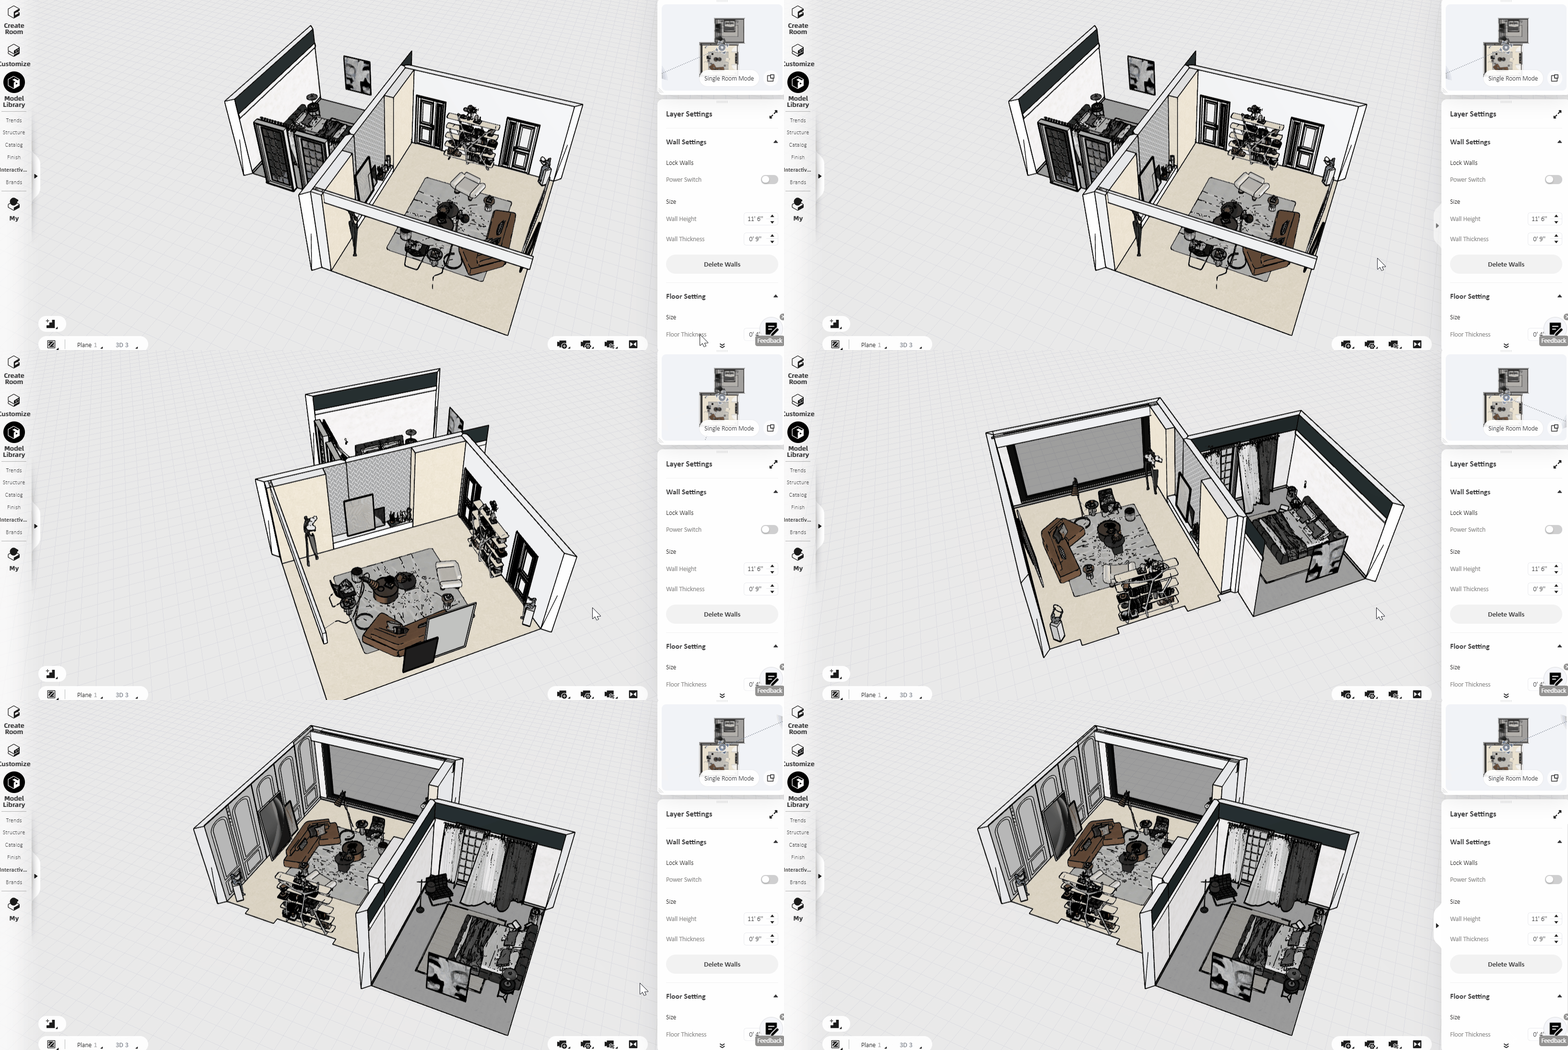
Through clicking the "space" bar you can quickly adjust the angle of view to rotate by 45 degrees clockwise each time to help you quickly locate the right angle. Similarly, if you select a model and press the Space bar, the model would be rotated 45 degrees each time as well.
design
design
2.【Interior Modeling 2.0】
design
2.1【Interior Modeling 2.0】Supported to switch rooms or display all rooms
Select one of the rooms to enter the "Interior Modeling 2.0", click on the "Switch Room" function on the right side, you can switch different single rooms, or show all rooms when you do the modeling.

2.2【Interior Modeling 2.0】Customized model supported independent editing
First enter "Interior Modeling 2.0", double click to select the whole object, then click "group" to combine models (combination shortcut key: Ctrl+G). In this way, when you exit the Interior Modeling interface and go back to design, the grouped model shall remain independent, which is convenient for you to select and edit customized models individually.
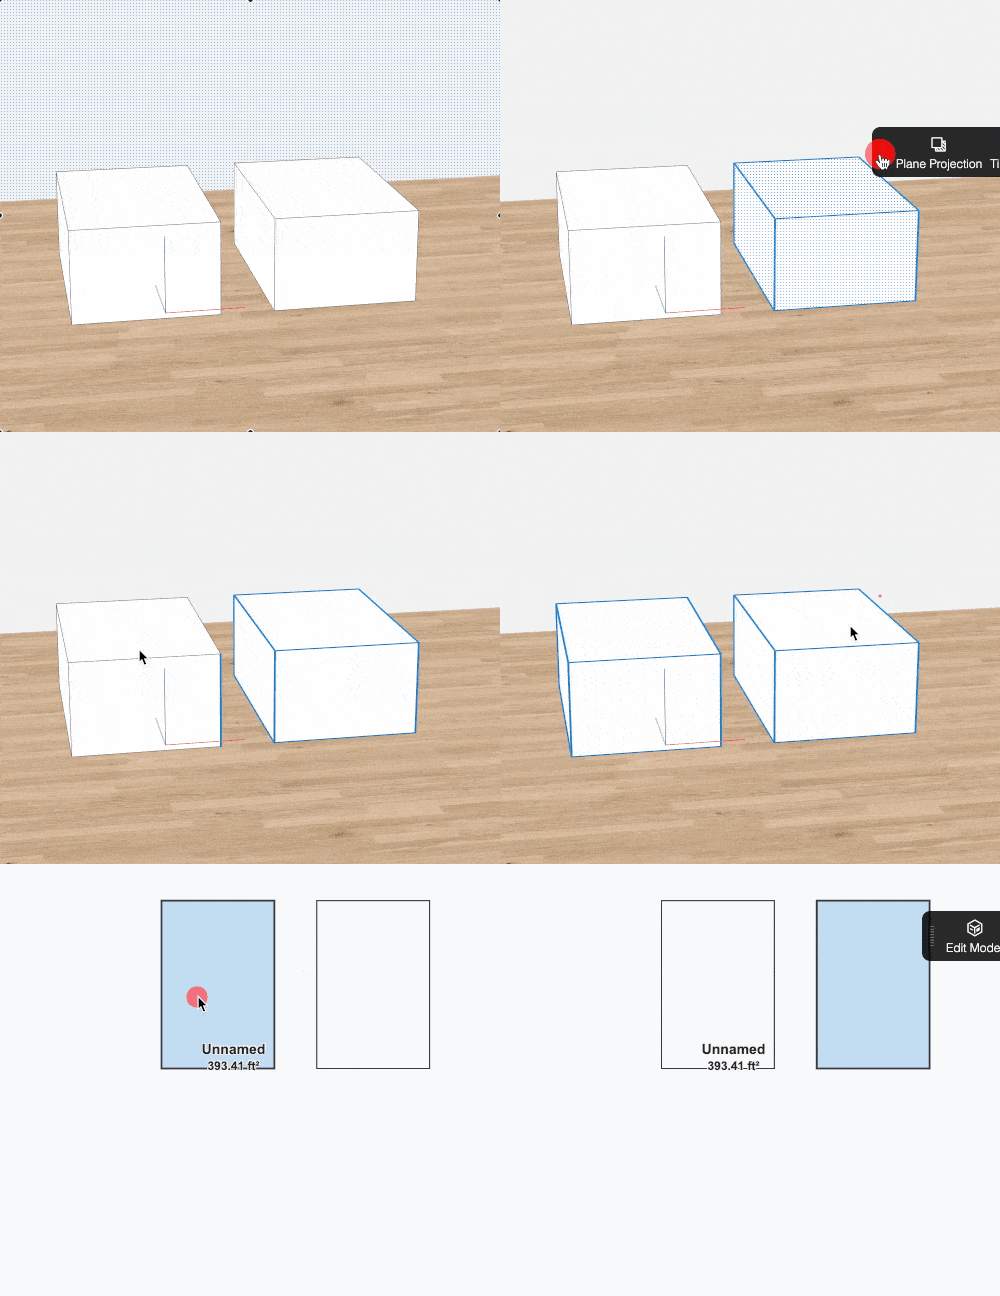
2.3【Interior Modeling 2.0】Supported to apply materials to customized models while modeling
design
After creating a customized model, there is no need to exit the current interface, you can directly select the model, select "Premium Texture" or "Texture" on the left to add materials to different parts of your model.

2.4【Interior Modeling 2.0】Added scaling tool to customized models
Select the desired zoom model, click the "Scale" function, and adjust the blue anchor point for proportional scaling.

2.5【Interior Modeling 2.0】Left click to evoke the menu bar
Change the menu bar that appeared by right-clicking to the left-clicking model to display the menu bar.
Maintaining a unified operation mode with other modules can also help us discover and use functions more quickly in the design process.

2.6【Interior Modeling 2.0】Newly added geometric model
"Interior Modeling 2.0" adds commonly used geometric models, no need to draw manually, select "Component"-"Geometry" on the left, and place them directly in the scene.

2.7【Interior Modeling 2.0】Added eraser function
Enter "Interior Modeling 2.0", click "Eraser" and then click on unwanted items to erase directly.

2.8【Interior Modeling 2.0】Added three-point arc drawing function
Select the "Draw Arc" function at the top (shortcut key: Ctrl+K), click arbitrarily to determine the starting point position, and then confirm the end point position, enter the arc parameters at the bottom to form an arc shape.

2.9【Interior Modeling 2.0】Supported displaying "Sunken Ground"
and "Outside Area"areas
During the design process, if you add "Sunken Ground" and " Outside Area" models, the model location will be displayed after entering Indoor Modeling 2.0. Provide reference for you when modeling.

design
3.【Tile Flooring】
design
3.1【Tile Flooring】The angle of the floor tiles supports quick rotation
by pressing the "space bar" to rotate 45 degrees clockwise each time
The angle of the tile floor supports the "space bar" to quickly rotate(the view will be rotated by 45 degrees each time) to help you quickly locate the right angle.
design
4.【Image & Video Rendering】
design
4.1【Render】Rendered pictures supported "Download Material ID Map"
Open "Images" then click the "Download" button on the finished render, click "Download lD Map", after downloading, you can view the downloaded file in the default download file of your browser.
You can import all the downloaded files into Photoshop, and use the magic wand tool to quickly cut out the model materials of the original image.

4.2【Render】Added "Daylight 4.0" intelligent lighting template
「Daylight 4.0」is more natural in daylight treatment. It weakens daylight and shadow treatment and alleviating the problem of stiff light sources. In terms of overall color temperature, the color temperature of Daylight 4.0 is closer to the cool color system, while the rendering effects of Daylight 3.0 is warmer.

Detailed operation:Enter "Render" interface and then select "Daylight 4.0" in "Lighting" to render. You can also customize lighting by clicking "Add Lights" and then adjust based on Daylight 4.0 template.

4.3【Video】Video resolution added 540p and you can spend
Homestyler points for it
Enter "Render", select "Video" and adjust the resolution to "540p Video". You can use 10 Homestyler points to render a 10-second 540p video.

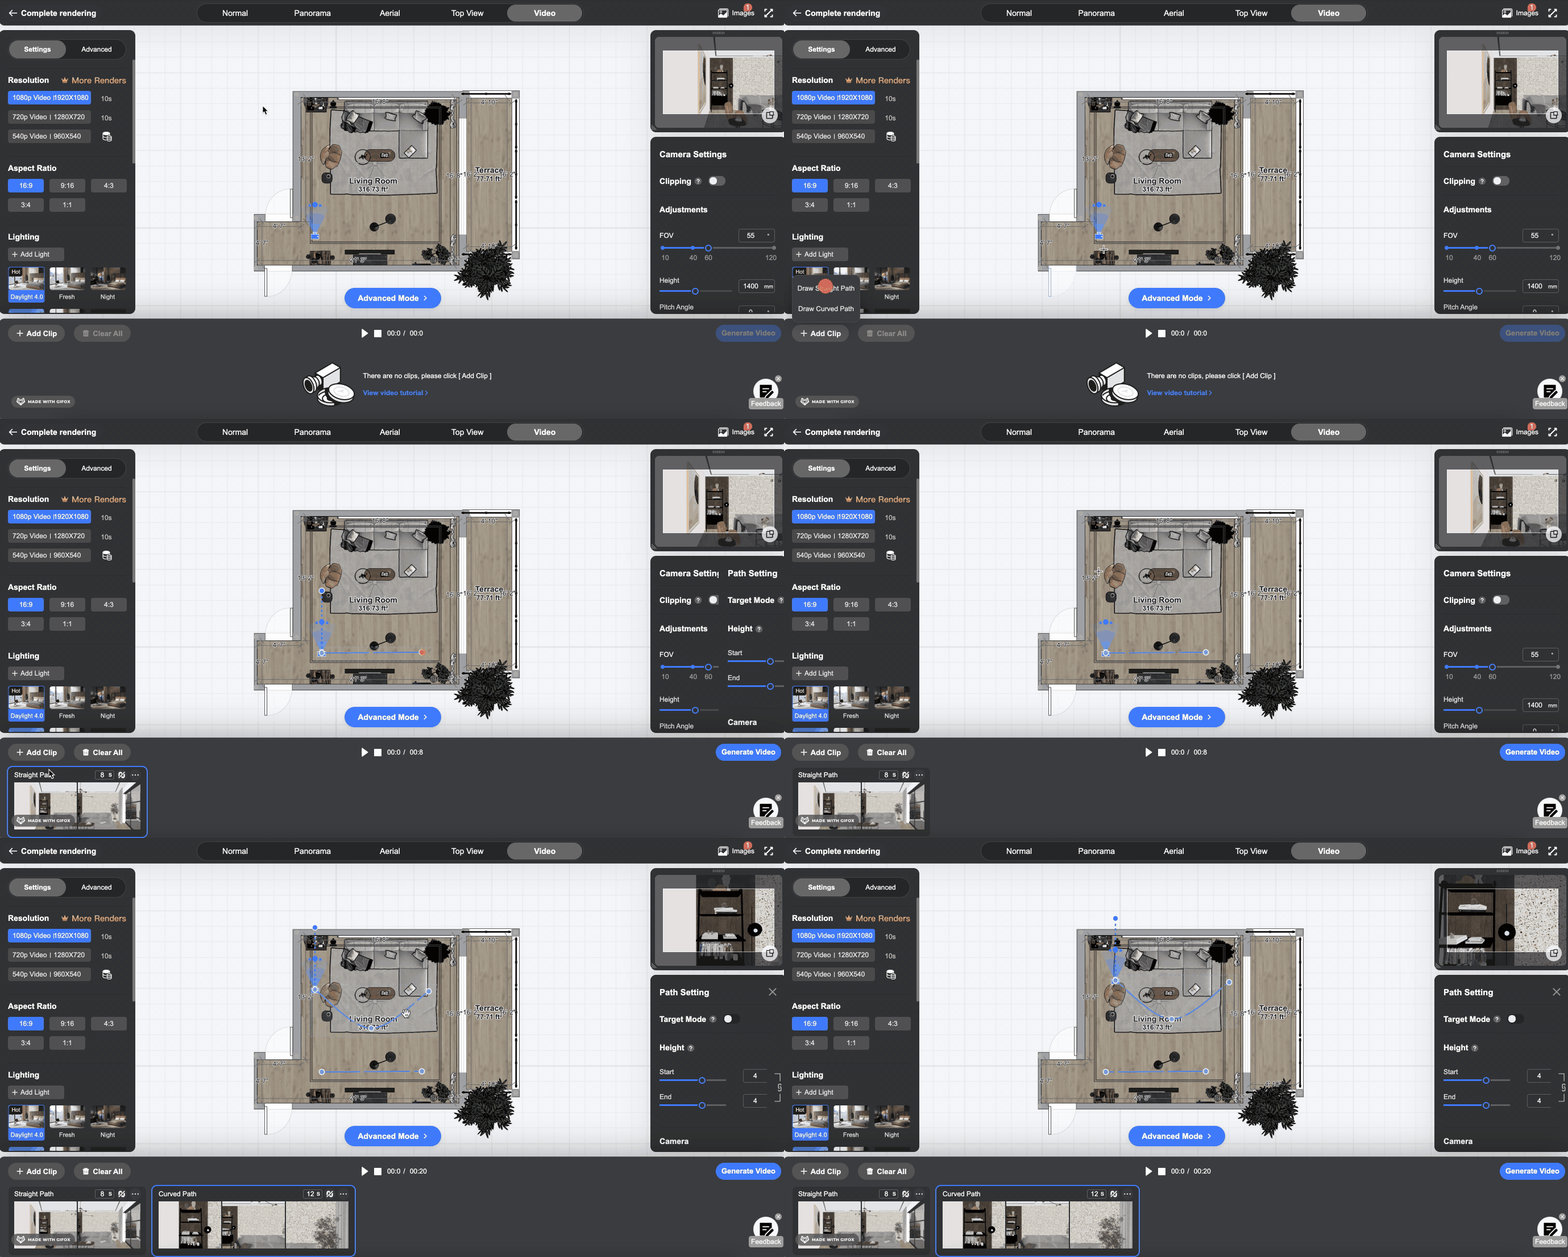
4.4【Video】Support directly drawing curved path and straight path
Support drawing curved path and straight path for the camera. Click "Add Clip" to select a straight or curved path and draw different paths in the room. You can also adjust the path parameter in the right and preview the video clip by clicking the "Play" icon.
4.5【Video】Video rendering added advanced mode
In the advanced mode, you can make more customized clips by adding keyframes. And add animated motion effects to each model if the clip is set to "Grow Effect" (in the upper right corner of each clip).
Detailed tutorial :https://youtu.be/YvTBHCeX0Zk
4.6【Video】The lamps support brightness change animation in video
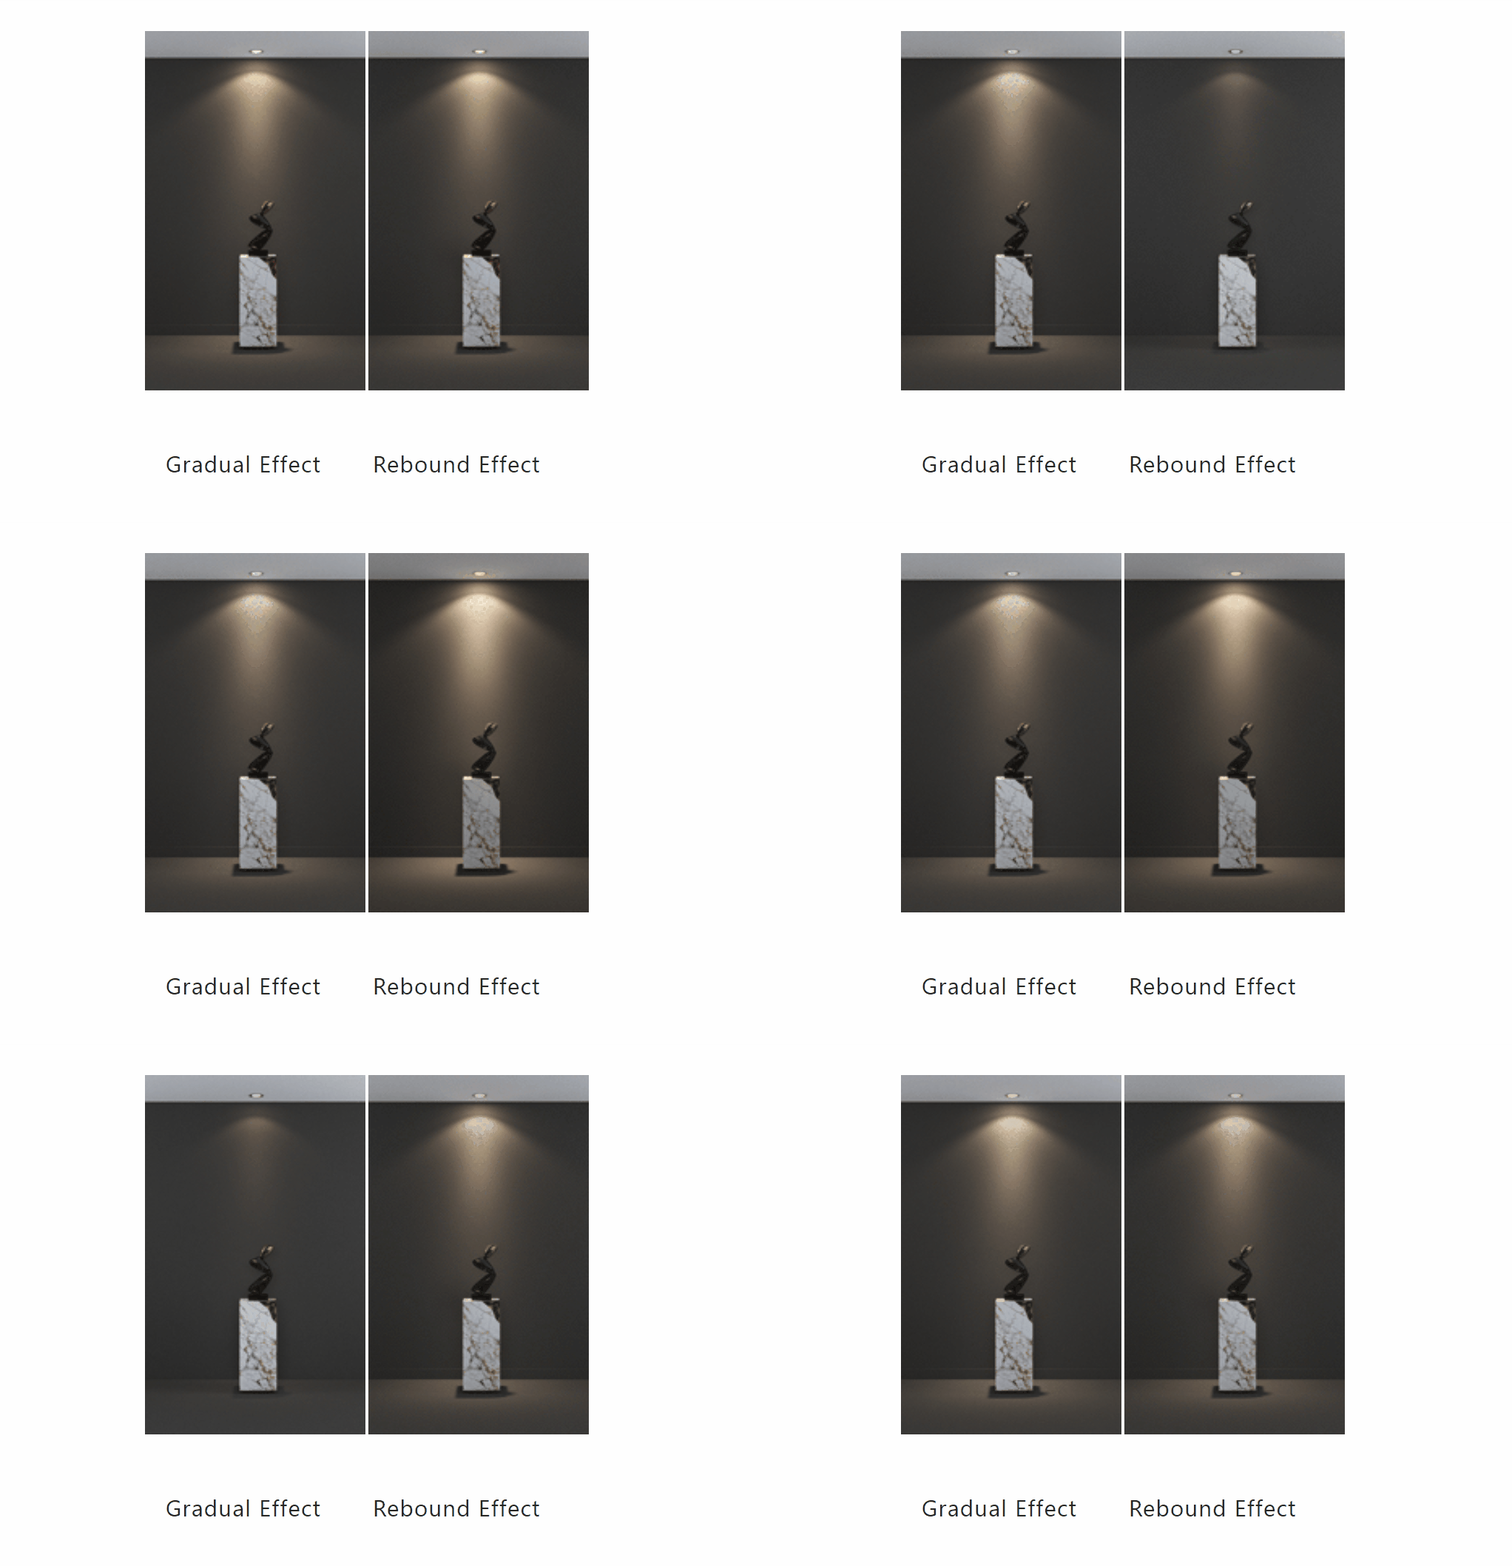
If you need to set the lighting effects of the fixtures in the video, enter "Rendering""Video" and select "Advanced Mode", click on the fixtures that need to set brightness changes, and turn on "Whether to change the lamp brightness" and set “Gradual“ or ”Rebound“ in "Change Curve" Effect.
The following are “Gradual“ or ”Rebound“lighting effects:
