
1.【General Features】
1.1【Function】Wall drawing tool supported wall angle setting
1.2【Function】2D and 3D view added furniture positioning line, RCP added lighting positioning line
1.3【Function】Restrictions on the size of "Floor Opening" and "Sunken Ground" are reduced.
1.4【Function】The baseboard can be applied to all rooms with one click
1.5【Function】Added multiple Door Pocket
1.6【Function】"Replace Material" supports restore to the original material
1.7【Function】Added "Sign Out" function in the design interface
1.8【Function】New designs added the automatic save function
design
2.【Full house furnishing】
2.1【Full house furnishing】Added a new smart "Customize Ceiling" function
2.2【Full house furnishing】Added professional "Customize Wall "function
2.3【Full house furnishing】Added free "Customize Floor" function
2.4【Full house furnishing】“Tile Flooring”Added Guide Lines function
design
3.【Interior Modeling 2.0】
3.1【Interior Modeling 2.0】Added“3D Fillet” function
3.2【Interior Modeling 2.0】Added“Revolve” function
3.3【Interior Modeling 2.0】Custom models in My Favorite supported renaming
design
4.【Rendering】
4.1【Render】Supported Batch Watermark Removal(Member Exclusive)
4.2【Render】Render editor supports "depth of field effect"(Member Exclusive)
4.3【Render】Normal pictures added Auxilary lines
4.4【Render】Added 15 kinds of "Spot Light"
4.6【Render】Added opening animation to panorama
design
Detailed Introduction:
1.【General Features】
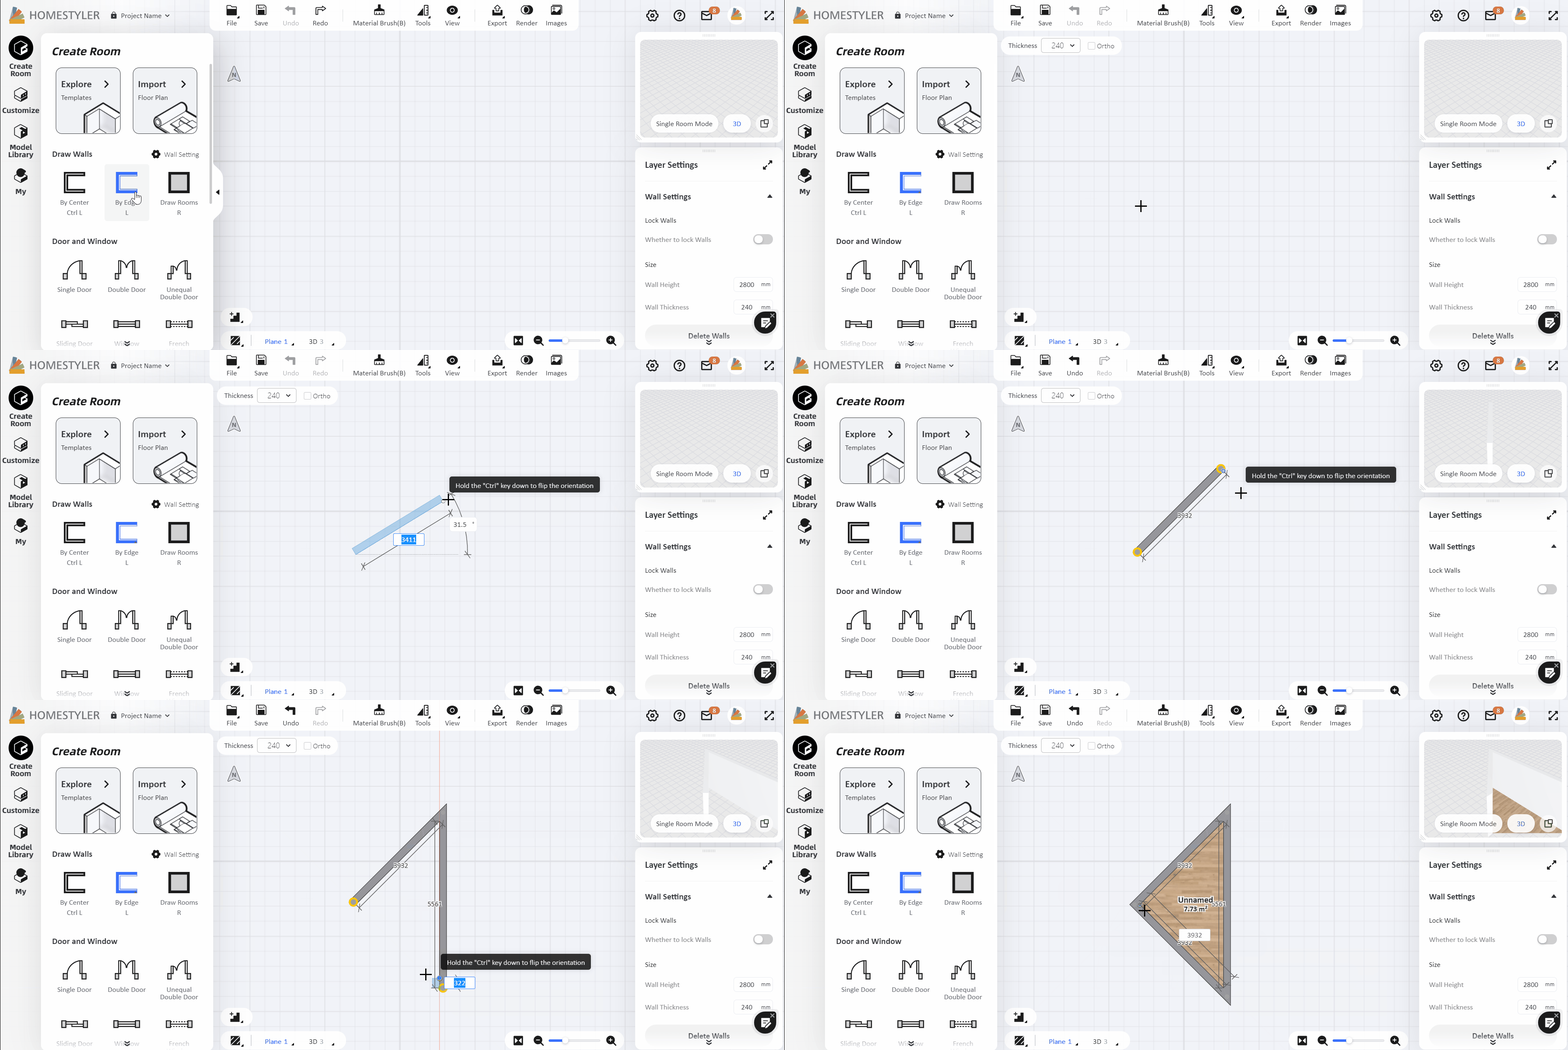
1.1【Function】Wall drawing tool supported wall angle setting
Select the wall drawing tool, and left-click on the canvas to draw. When the wall is not in a vertical or horizontal state, an angle input box will appear. Enter an appropriate value to set a precise angle of the wall.
1.2【Function】2D and 3D view added furniture positioning line, RCP added lighting positioning line
In the plane view, click on "View - 2D Positioning" on the top navigation bar to place the furniture precisely into the room on the plan.

In the 3D or Roam view, click on "View - 3D Positioning" on the top navigation bar to place the furniture precisely into the room with the guides showing the distance in the six directions to the surfaces of the room.

In the RCP view, click on "View - Lighting Positioning" on the top navigation bar to place the lamp precisely in the ceiling.

1.3【Function】Restrictions on the size of "Floor Opening" and "Sunken Ground" are reduced
The restriction on the "Floor Opening" and "Sunken Ground" sizes have been reduced so you could customize them freely based on your needs.

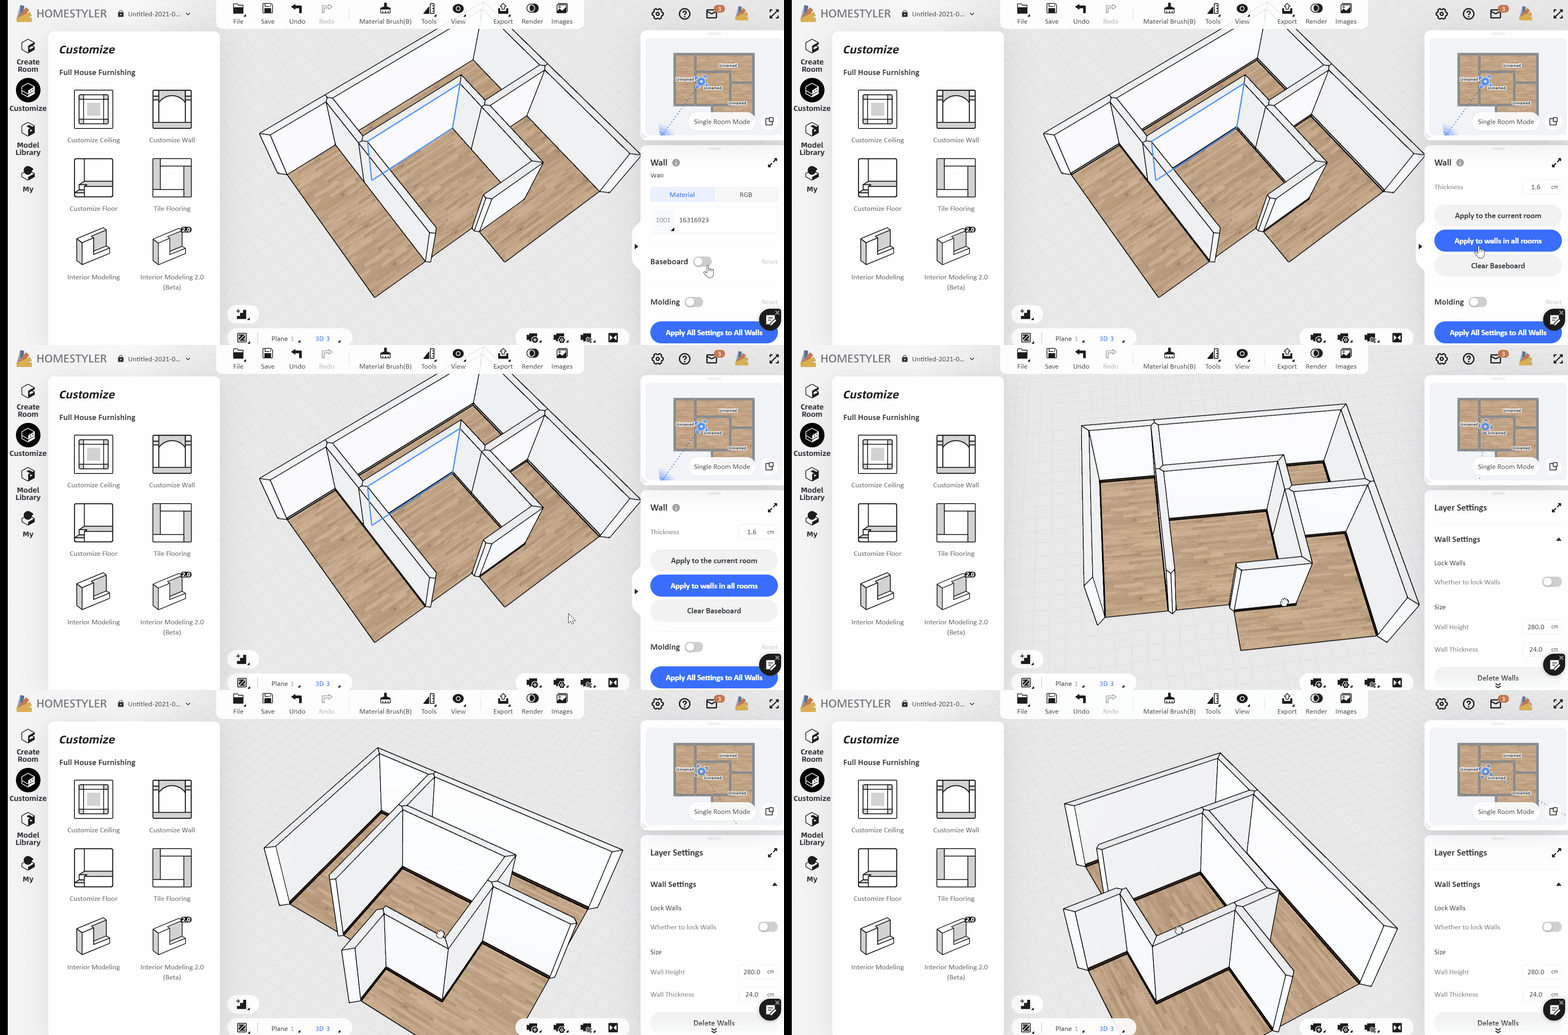
1.4【Function】The baseboard can be applied to all rooms with one click
Switch to 3D or Roam view, click any wall, and switch on the "baseboard" option in the property bar on the right. After setting up a proper styler, you can click "Apply to walls in all rooms" below to easily apply the baseboard to all the rooms.
1.5【Function】Added multiple Door Pocket
Select a door, window or wall opening, switch on the "Pocket" option on the right property panel under "Style", then you can change the door pocket style.

1.6【Function】"Replace Material" supports restore to the original material
In the material replacement interface, after the model material is replaced, you could restore the model to the original material, click on "Original Material" on the top navigation bar and then click "Recover all materials" or "Recover the selected area".

1.7【Function】Added "Sign Out" function in the design interface
Hover your mouse over the avatar in the upper right corner and click "Sign Out". Remember to sign out on a public device so as to keep your design data safe.

1.8 【Function】New designs added the automatic save function
When you open a new design and draw a wall or place a model on the canvas, the system will automatically save the project for you. You do not need to worry about the project’s data loss. Similarly, you can modify it to the name as you wish.

2.【Full house furnishing】
2.1【Full house furnishing】Added a new smart "Customize Ceiling" function
Pitched, gabled, or grid ceiling? Apply Parametric Ceiling with Simply One Click!
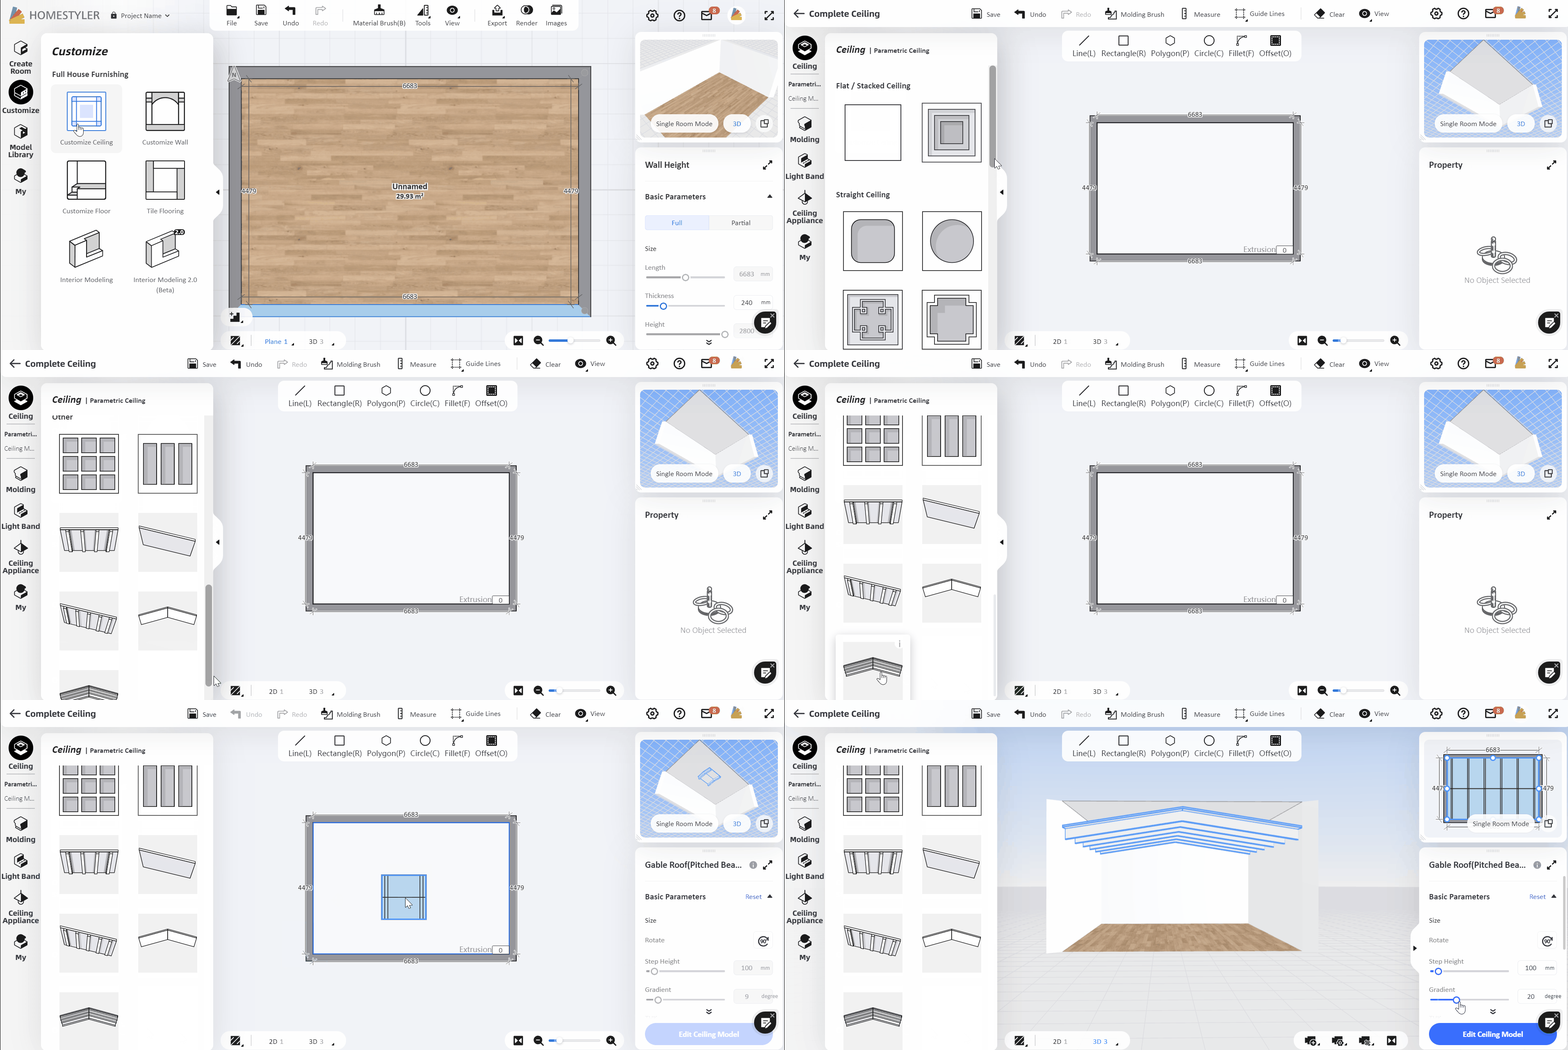
Detailed tutorial:https://www.homestyler.com/blog/1301?spm
2.2【Full house furnishing】Added professional "Customize Wall "function
The new "Customize Wall" function allows you to focus on the designated wall and improves wall decoration efficiency. We have also added more decorative moldings and you could drag to decorate your walls.

2.3【Full house furnishing】Added free "Customize Floor" function
According to your design requirements, the new "Customize Floor" function allows you to focus on the designated floor. Simply draw shapes, extrude and then you could easily create a floor platform, stacked stairs, or other floor structure.

2.4【Full house furnishing】“Tile Flooring”Added Guide Lines function
Enter "Tile Flooring" and then click "Guide Lines-Add Guide Lines", left-click on any side on the canvas, enter the specific distance value, and you can get the precise guides as a reference to draw.

3.【Interior Modeling 2.0】
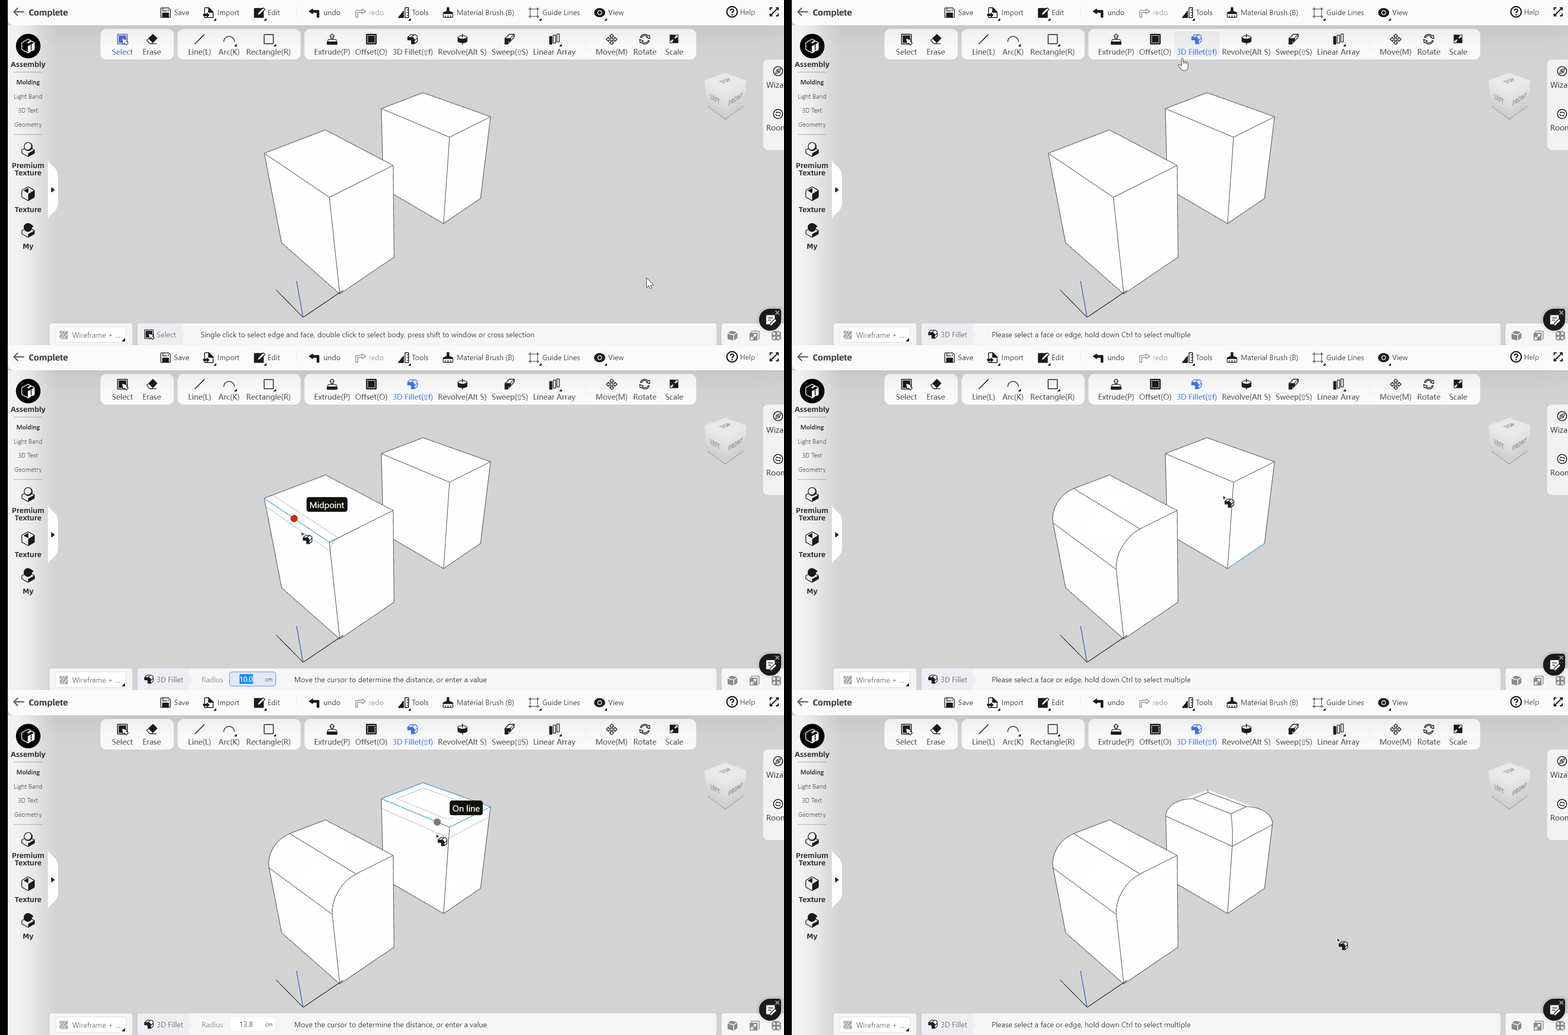
3.1【Interior Modeling 2.0】Added“3D Fillet” function
Select an edge or a surface of the custom model, click "3D Fillet" to chamfer the model, it can make the edge of your custom model no longer sharp.
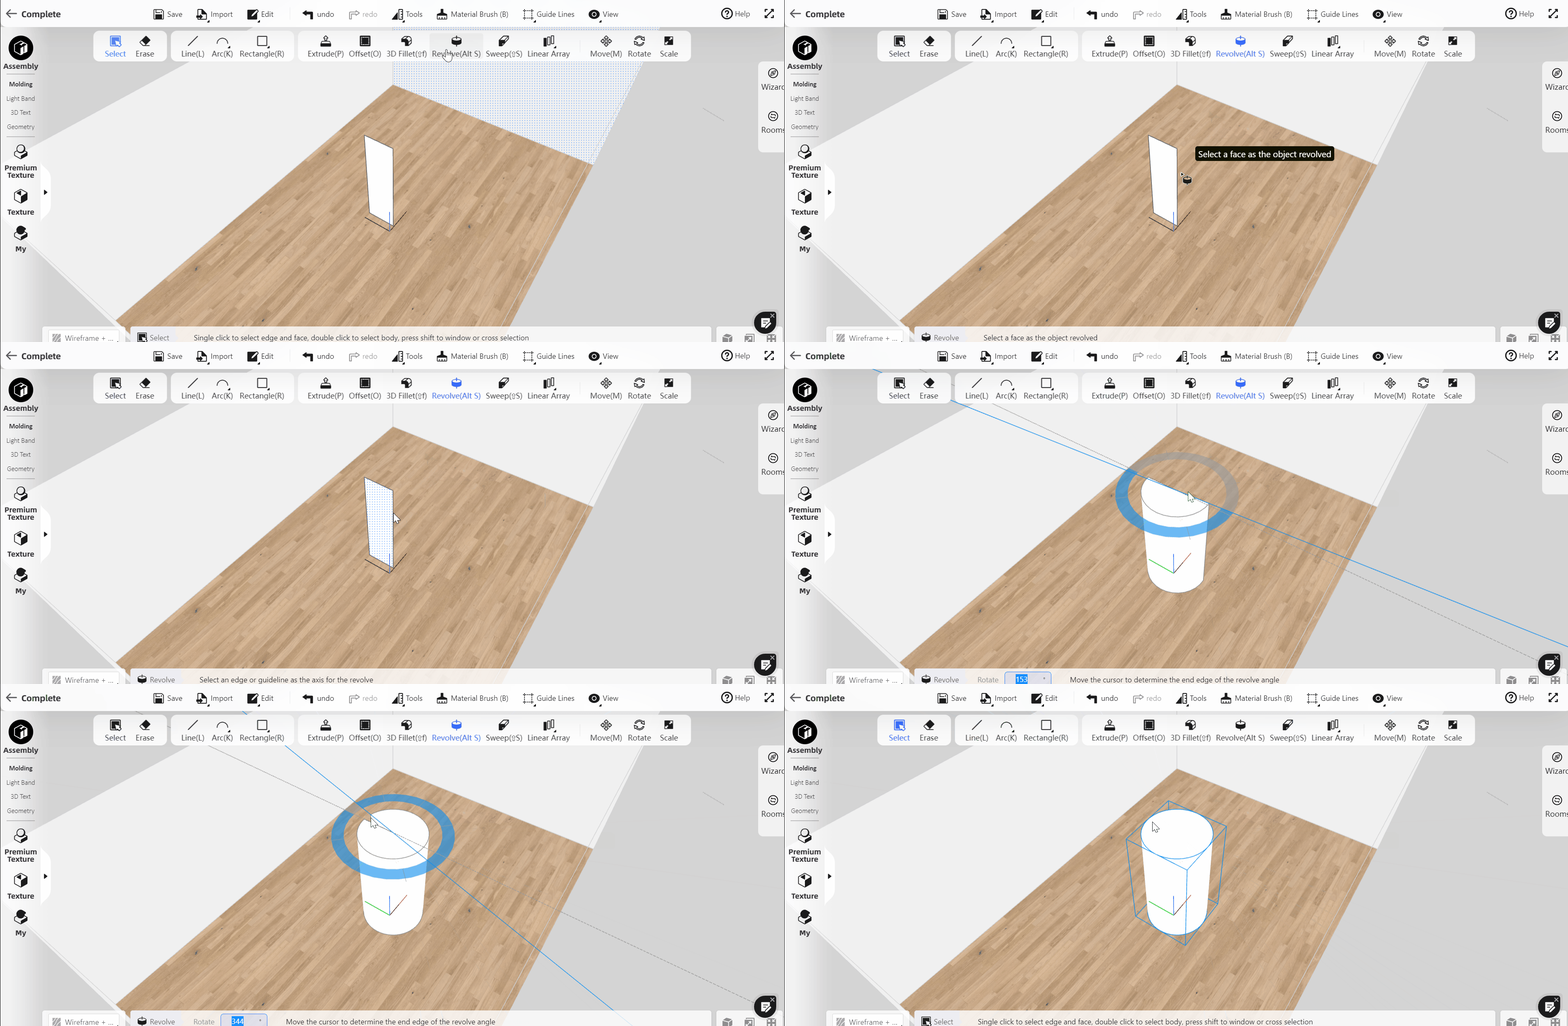
3.2【Interior Modeling 2.0】Added“Revolve” function
Draw a surface, select "Revolve" and click on an edge of the surface as the revolve axis. Then it can quickly turn a plane into a 3D model around an axis.
3.3【Interior Modeling 2.0】Custom models in My Favorite supported renaming
Left-click on the customized model and click "Add Fav" to add the model to the "Customized Model" under "My - Uploads", or you can click the "Add to My Library" button on the right bottom corner of the property panel. In "My - Uploads - Customized Model" you could find the model you just saved and you could now rename these models.

4.【Rendering】
4.1【Render】Supported Batch Watermark Removal(Member Exclusive)
Click "Image" to enter the album of renders, select multiple renders or check "Select All", and then click "Remove Watermark" to quickly remove watermarks in batches.

4.2【Render】Render editor supports "depth of field effect"(Member Exclusive)
Click on the "Edit Image" button on the lower right corner of a certain render, and then you will enter the render retouch interface. Click on the area in the image that needs to be focused, and adjust the corresponding parameters in the right panel "Whole Image - Depth of field effect"

4.3【Render】Normal pictures added Auxilary lines
Enter the rendering interface, select the "Normal" type of rendering, and click the "Auxiliary Line" button in the lower right corner to select an auxiliary line type.

4.4【Render】Added 15 kinds of "Spot Light"
When you render, click on "Add Light" to customize your own lighting template, and in the virtual light section, 15 new spotlight sources have been added. If you want to highlight a certain piece of furniture or ornaments, you can choose a spotlight to fill in the light.

4.6【Render】Added opening animation to panorama
Edit the panorama and click "Setting" to open "Opening Animation", and then you can switch on or off the opening animation when others open your panorama link.

