
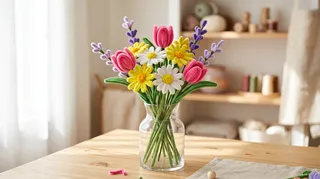
- 3–5 chenille stems for petals, depending on the flower size
- 1 green chenille stem for the stem and leaves
- 1 short contrasting stem for the center
- Scissors, if you need to trim the ends
- A small jar or vase to display the finished flowers
A bouquet that never wilts, needs no water, and can be made in an afternoon? That is the charm of pipe cleaner flowers. With a few chenille stems, scissors, and a little twisting, you can turn soft, fuzzy craft supplies into daisies, tulips, and roses that look cheerful in a jar or wrapped as a handmade gift.
This tutorial walks through the basic flower-making method, then shows how to adjust it for different blooms. The steps are forgiving, which makes this a good project for beginners and older kids working with an adult. You do not need special tools or perfect symmetry. In fact, a slightly wonky petal often makes a handmade flower feel more like itself.
Gather a Few Supplies Before You Start
Chenille stems are the familiar fuzzy wires sold in craft packs. They bend easily, hold their shape, and come in enough colors to make a flower and its stem from the same material. For a first try, choose one petal color, green stems, and a contrasting center color. A small palette usually looks more intentional than using every color in the pack at once.
You will need:
Keep the scissors for adult use if children are crafting. The wire ends can also feel poky, so fold any exposed tips inward and tuck them between the fuzzy fibers. For a sturdier stem, twist two green stems together before attaching the flower head.
Before you begin, decide how large you want the bloom. A flower head about 3 inches (7.5 cm) across is easy to shape and sits nicely in a small vase. Larger blooms need more chenille stems and can become floppy unless you reinforce the center. I recommend starting small; it is much easier to make a second flower bigger than to rescue a giant, lopsided one.

How to Make Pipe Cleaner Flowers, Step by Step
The basic method is simple: form loops for petals, secure them at the center, then attach the flower head to a green stem. Once you understand that sequence, you can change the number and shape of the loops to create different blooms.
Make a simple daisy
- Create the petals. Take one chenille stem and bend it into a loop about 1½ inches (4 cm) long. Pinch the base of the loop together. Continue making loops along the stem, keeping them roughly the same size. Five or six petals make a tidy beginner daisy.
- Secure the flower head. Bring the two ends together and twist them tightly at the base. Spread the loops around the center like spokes. If the petals bunch up, gently pull them apart rather than forcing the wire.
- Add the center. Wrap a short yellow or brown stem around the pinched middle. Twist it at the back to hold it in place, then fluff the fibers so the center looks full.
- Attach the stem. Fold the top of a green chenille stem into a small hook. Catch the hook around the twisted base of the flower and twist it closed. Give the flower head a gentle tug to check that it stays put.
- Shape and finish. Round each petal with your fingers and angle a few slightly forward. Bend the green stem into a natural curve, then add a leaf by folding a small loop and twisting its base around the stem.
Turn the same idea into a tulip
For a tulip, make three taller loops rather than several rounded petals. Pinch the top of each loop into a soft point, then bring the sides inward so the bloom cups around the center. A green stem attached at the base gives it a clean silhouette. Keep the petals close together; a tulip that opens too wide can look more like a star.
Try a fuller rose
A rose takes a little more shaping. Make a tight center coil from one stem, then wrap another stem around it in loose overlapping curves. Pinch the lower edge as you go so the bloom stays compact. The outer loops can be wider and softer than the center. If the rose head feels loose, twist the remaining wire around the base before attaching the stem.


Choose a Flower Shape That Fits Your Bouquet
A bouquet looks more balanced when the flowers vary in height and shape. Pair a few open daisies with one or two tulips, then use a rose as a focal bloom. You can also make several flowers in the same color family and vary the centers for a quieter arrangement.
| Flower | Petal shape | Good for | Approximate time |
|---|---|---|---|
| Daisy | Rounded loops around a contrasting center | First-time makers and cheerful mini bouquets | 10–15 minutes |
| Tulip | Three or four upright, cupped petals | A clean, simple silhouette | 15–20 minutes |
| Rose | A coiled center with overlapping outer petals | A fuller focal flower or handmade gift | 20–30 minutes |
These times are estimates for one flower after you have the basic technique down. Your first bloom may take longer while you work out how tightly to twist the base. That is normal. If the flower head spins on the stem, add another twist at the connection point or wrap a short green piece around the base to lock it in place.
Color makes a big difference, too. A single-color flower with a contrasting center reads clearly from across a room. For a softer look, use two nearby shades for the petals, such as pale pink and coral. I would avoid mixing too many bright colors in every bloom; a small, repeated palette makes even a playful craft bouquet feel considered.
If you are making flowers for a shelf or table, check the height against the vase before finishing the stems. Leave enough stem below the flower to hold it securely, but trim or bend the bottom so the bouquet does not sit awkwardly. You can preview the colors and proportions alongside a room setup in Homestyler before deciding where the finished arrangement will live.


Fix Loose Petals and Make the Bouquet Look Finished
If a petal keeps springing open, pinch its base more firmly and twist the wire around the center once more. Avoid pulling hard on the fuzzy covering; the wire inside is what holds the shape. For a flower that droops, shorten the stem or twist a second green stem alongside it. A heavy rose head often needs more support than a small daisy.
To make a bouquet feel fuller without using a dozen flowers, vary the heights. Keep a few blooms short and let one or two sit higher. Bend the stems gently rather than cutting them all to the same length. A plain glass jar works well because the stems become part of the display; a narrow-necked vase can help keep a small arrangement upright.
For a gift, wrap the stems together with a spare green chenille stem or a simple ribbon. Keep the flower heads loose enough that they do not crush against one another. If you are making the bouquet with children, let them choose the colors and shape the petals, then handle any trimming and final wire tucking yourself.
Start With One Flower
Make one daisy first and use it to test your petal size, center, and stem connection. Once that flower feels secure, repeat the same steps with a tulip or rose. The best part of pipe cleaner flowers is that mistakes are easy to reshape: open a loop, twist the base again, and try a different silhouette.
What began as an Autodesk innovation has evolved into a design platform used by more than 20+ million registered users (platform data, 2026) around the globe. Homestyler combines powerful rendering, an intuitive editor, and a vast furniture library to help you turn inspiration into photorealistic designs — whether you're redesigning a single room or planning an entire home.
A small handmade bouquet can brighten a desk, make a thoughtful gift, or add a pop of color to a shelf without needing care. If you are deciding where it will look best, Homestyler can help you picture the arrangement in your room before you settle on a vase or color palette. Start with a few stems, keep the shapes simple, and let the bouquet grow one flower at a time.
Diseño ahora GRATIS