

| Material | What it does | Helpful note |
|---|---|---|
| Fir, pine, or spruce | Creates the outline and fills the base | Choose fresh, flexible branches |
| Eucalyptus | Adds texture and a muted green tone | Use sparingly if you want a traditional look |
| White roses or ranunculus | Adds a clear focal point | Buy a few stems rather than filling every gap |
| Red berries or hypericum | Brings in a small festive accent | Keep berries away from young children and pets |
| Pinecones and dried orange | Adds natural texture | Attach with florist wire if they need support |
| Low bowl and chicken wire | Holds stems in place | Check that the container is watertight |
| Florist wire and twine | Secures details | Cut wire ends short and tuck them away |
A Christmas centerpiece can look like it took a florist all afternoon, even when you made it at your kitchen table in under an hour. A kerstworkshop bloemschikken—a Christmas flower-arranging workshop—is a lovely way to make that happen, whether you’re hosting friends or simply want a hands-on afternoon before the holidays.
The secret isn’t a complicated recipe or a basket overflowing with expensive flowers. It’s a clear shape, a few dependable materials, and greenery that gives the arrangement structure. In this guide, you’ll plan a relaxed workshop, choose flowers that work together, and build a centerpiece that suits your table. You’ll also find practical tips for keeping the arrangement fresh and making cleanup painless.
Start with a simple plan for your kerstworkshop bloemschikken
Before buying flowers, decide what everyone will make. A low centerpiece is a good first project: it fits on a dining table, doesn’t block conversation, and can be built with a modest selection of materials. For a group, choose one basic design and let each person personalize the color or finishing details. Too many options can turn a cheerful workshop into a long debate over ribbon.
Set out a work area that can handle water and stray needles. A wipe-clean tablecloth or a few reusable trays will do the job. Put tools in the middle, but give each person a small space for their own stems and clippings. If children are joining, keep sharp tools with an adult and offer safe tasks such as sorting pinecones or tying ribbon.
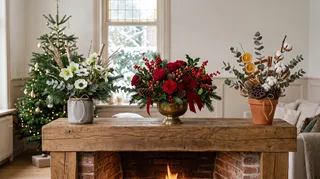
A useful shopping rule is to buy the greenery first, then choose flowers that complement it. Fir, pine, or spruce gives a centerpiece its seasonal outline. Eucalyptus adds a softer, silvery note, while a few white flowers keep the arrangement from feeling too heavy. Red berries or dried orange slices can bring in a traditional accent without requiring a large number of blooms.
For a calm, modern look, keep the palette to two or three colors. I’d rather see a few well-placed flowers than a crowded arrangement where every stem competes for attention. And if you’re hosting several people, prepare a sample centerpiece before the workshop begins. It gives guests a visual guide without making everyone’s finished piece identical.

What to gather before you begin
A good workshop doesn’t need a professional florist’s kit. Start with clean, sharp pruning shears, a bucket of water, and a base that holds stems securely. Floral foam is familiar, but it isn’t the only option. A small bowl or low container fitted with a ball of chicken wire can support stems while allowing you to avoid foam. Secure the wire inside the container so it doesn’t shift as you work.
Here’s a practical materials guide:
For a centerpiece about 12–16 inches (30–40 cm) wide, a small bundle of greenery, a handful of focal flowers, and a few accents are usually enough. The exact amount depends on how full you want the finished piece to look. If you’re arranging with a group, buy a little extra greenery: it’s the easiest material to share and the most forgiving when someone cuts a stem too short.
Before guests arrive, trim the ends of the greenery and place the stems in water. Keep flowers in a cool spot, away from direct sun and heaters. Set out a bowl for offcuts and a damp cloth for sticky sap. These small preparations make the actual arranging feel much less chaotic.

Build the arrangement in layers, not all at once
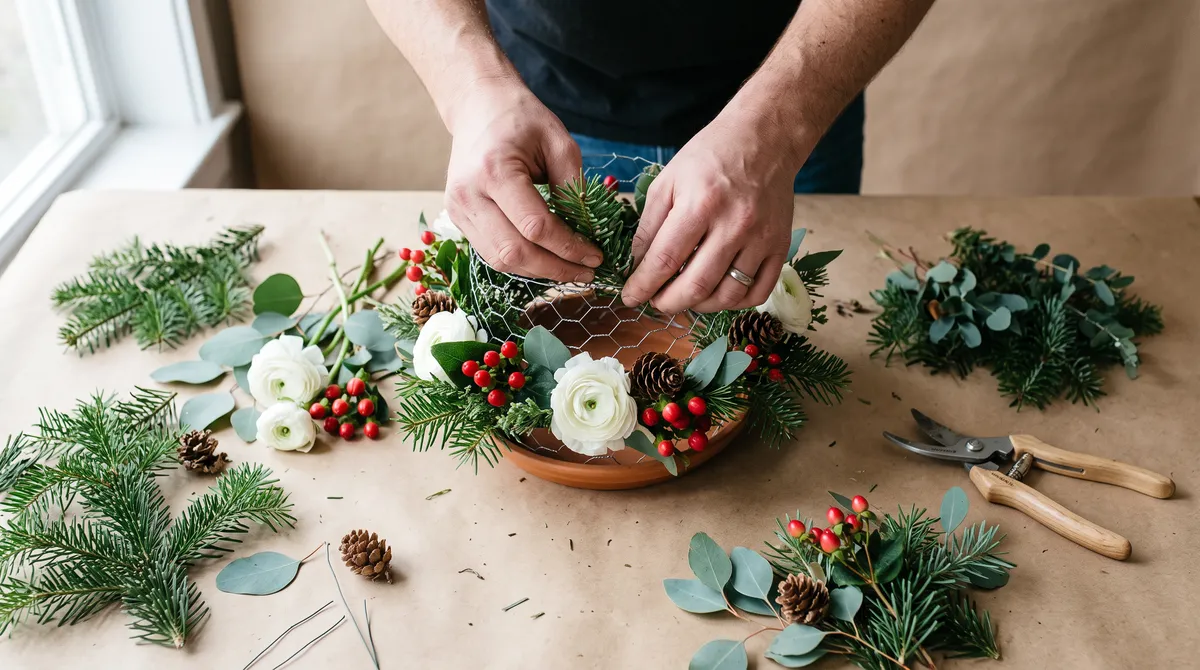
The easiest way to make a balanced centerpiece is to work from the outside in. Start by placing greenery around the edge of the base, angling the stems outward so the arrangement has a natural, low profile. Add a few shorter pieces across the center to cover the mechanics. Step back every few stems. It’s much easier to correct the shape early than to pull apart a finished arrangement.
Next, add your focal flowers. Grouping them in small clusters usually looks more natural than spacing every bloom evenly. Keep the flower heads at slightly different heights, but avoid making the center so tall that guests have to lean around it to talk. Add berries and other accents last. They should guide the eye through the arrangement, not become a dotted border around the edge.
A simple sequence keeps the project manageable:
- Prepare the base. Fit chicken wire into a low, watertight bowl and secure it firmly.
- Create the outline. Add greenery around the rim, keeping the overall shape wider than it is tall.
- Fill the middle. Use shorter evergreen and eucalyptus pieces to hide the base.
- Place focal flowers. Add a few blooms in loose groups, turning the bowl as you work.
- Finish with accents. Tuck in berries, pinecones, or dried orange where the arrangement needs a little contrast.
If you’re unsure about the proportions, take a quick photo from above and from the side. The camera often makes an uneven shape easier to spot. You can also use Homestyler to preview how a low centerpiece might sit with your table and room colors before you settle on a palette. It’s a handy way to think about scale, especially if your table is narrow or already has place settings and candles.

Keep it fresh and make the workshop easy to host
Fresh greenery can last well through the holiday season if you give it a little care. Keep the arrangement away from radiators, fireplaces, and sunny windows. Check the base every day or two and add a small amount of water if the stems are sitting in a water-holding container. Avoid pouring water over flowers or decorative details; a careful top-up is less likely to disturb the design.
For a workshop, plan on roughly 60–90 minutes for a simple centerpiece, with extra time for chatting and cleanup. Put a finished example on the table, but don’t insist that everyone copy it exactly. Some guests will want a neat, symmetrical shape; others will prefer a loose, woodland look. Both can work if the greenery gives the arrangement a clear outline.
A few small hosting choices make a noticeable difference:
- Pre-cut wire into manageable lengths so guests aren’t wrestling with a spool.
- Keep a spare bowl of greenery nearby for repairs and last-minute filling.
- Use a tray under each arrangement when guests carry their work home.
- Offer ribbon as an optional finish, not a required step. Natural twine can look just as good.
- Set aside a safe place for tools when children are helping.
When the holidays are over, remove the flowers and greenery before cleaning the container. Let the bowl and wire dry fully, then store reusable materials together. If you want to plan the finished table setting as well as the centerpiece, Homestyler can help you test colors and proportions in the room before you rearrange the furniture.
Make one centerpiece, then enjoy the afternoon
A successful kerstworkshop bloemschikken doesn’t depend on perfect technique. It comes down to a comfortable setup, fresh greenery, and a design simple enough that everyone can make it their own. Start with a low base, build the outline first, and add flowers only where they’ll make a difference.
Built on technology originally developed at Autodesk, Homestyler empowers anyone to design beautiful, realistic spaces in minutes. Join over 20+ million registered users (platform data, 2026) who have already discovered a smarter way to plan, visualize, and bring their dream homes to life — all from the comfort of a browser.
If you’re hosting, prepare the materials ahead of time and let the conversation be part of the project. If you’re arranging solo, put on some music, take your time, and don’t worry about a stem that leans a little. A handmade centerpiece should feel welcoming, not like a test.
Concevez maintenant gratuitement