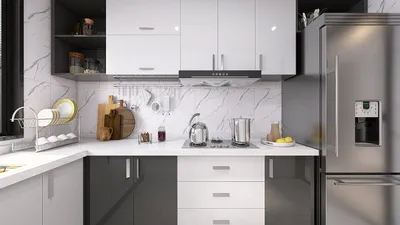


Over the last decade, I have designed and installed numerous straight-line (slim or under-cabinet) kitchen chimneys, particularly catering to compact urban kitchens where aesthetics, clear sightlines, and storage efficiency are crucial. The simple profile conceals a depth of technical considerations—airflow calculations, required clearance, optimal lighting angles, noise management, makeup air requirements, and how these factors interact with the cooktop’s function. When executed properly, this results in cleaner cabinets, improved air quality, and a quieter, more enjoyable cooking experience.
To successfully capture cooking fumes, it’s essential to start with credible performance metrics. The WELL v2 A05 feature emphasizes enhanced ventilation through effective source capture and filtration—the key tactics to improve indoor air quality. This approach highlights that extracting air directly at the source leads to measurable improvements (WELL v2 A05: Enhanced Ventilation). Insights from Steelcase research link environmental comfort—covering air quality, lighting, and acoustics—to cognitive performance. I integrate these principles within residential kitchens, where long cooking sessions demand both comfort and clarity.
The integration of quality lighting is equally vital. According to the Illuminating Engineering Society, aiming for a task lighting level of 300–500 lux on kitchen surfaces is advisable, with glare mitigation and directional lighting to avoid reflections on glossy finishes (IES task lighting guidance). I direct the LED task lights of my chimneys to produce around 350–450 lux above the stovetop, and I complement this with under-cabinet lighting to eliminate shadows over preparation areas.
Understanding Straight-Line Chimneys: Their Function and Benefits
A straight-line chimney is a slender hood that is generally installed beneath or flush with wall cabinetry. It is well-suited for linear and L-shaped kitchens where uninterrupted upper storage and clean sightlines are desired. In contrast to wall-mounted hoods, it minimizes visual bulk, which is particularly important in small galley kitchens. With appropriate ducting or high-efficiency filters, these models can outperform larger hoods, as they are positioned closer to the source of smoke and odors.
Airflow Dynamics: Calculating the Right CFM
For gas stoves, I usually apply the guideline of approximately 100 CFM for every 10,000 BTU of burner output, then modify based on the cooking method. For electric or induction cooktops, a range of 150–300 CFM is typically adequate for lighter tasks, though more demanding cooking—like high-moisture boiling or heavy searing—can require 350–450 CFM. For frequent wok-frying or deep-frying, I recommend a range of 500–650 CFM. In smaller apartments, excessive CFM without adequate makeup air might create backdrafts or compromise combustion appliances, hence more is not always better.
Capture Efficiency: Consider Depth, Overhang, and Height
Effective capture hinges on the geometry of the hood, in addition to raw airflow. I prioritize a depth that either meets or slightly exceeds the front burners (commonly 11–13 inches for straight-line designs). The bottom edge should be mounted 24–30 inches above the cooking surface; I find that 26–28 inches works well for most households. In cases where clients are taller or utilize large pots, I might test at 29 inches while increasing CFM by about 10% to ensure effective capture.
Ducted vs. Ductless: Choosing Wisely
I generally prefer ducted systems as they effectively expel heat, humidity, and odors from the home. For best results, use smooth metal ducts, minimize bends (as each 90-degree turn can reduce effective CFM by roughly 30–50), and aim to keep duct runs under 12–15 feet when feasible. Ductless models are practical in apartments that lack access to external walls; in this case, opt for high-quality carbon filters and replace them every 3–6 months if cooking frequently. A hybrid solution—temporary recirculation with plans for future ducting—provides flexibility during renovations.
Noise Management: Sones, Remote Options, and Best Practices
Noise is often a barrier to effective kitchen ventilation. Aim for a range of 1.5–4 sones during operation. If the kitchen layout permits, consider an inline or external blower to divert noise away from the cooking area. Additionally, I advise clients on optimal fan usage: activate the fan 1–2 minutes before cooking to establish an updraft, then keep it running for 10–15 minutes after cooking to ventilate any lingering moisture.
Lighting Considerations: Lux, Color, and Glare
Bright, neutral task lighting reduces the chance of errors and alleviates eye strain. I typically specify lighting levels of 350–450 lux at the stovetop, with a color temperature between 4000–4500K for accurate color rendering, and a CRI of over 90 for precise doneness assessment. To minimize glare, I recommend adding diffusers or prismatic lenses and pairing chimney LEDs with dimmable under-cabinet lighting for consistent illumination.
Filter Choices: Baffle, Mesh, and Carbon
For heavy, oily cooking, baffle filters are my preferred option, as they maintain airflow while effectively trapping grease through directional changes. Mesh filters are suitable for lighter cooking but tend to clog quicker. Carbon filters are primarily for odor control in ductless systems, not for grease capture. Regardless of your choice, remember to factor in maintenance: baffles should go in the dishwasher every 2–4 weeks for frequent cooking, so set reminders accordingly.
Sizing and Proportions: Choosing the Right Straight-Line Configuration
Ensure that the width of the hood matches that of the cooktop, or exceeds it by 3 inches on either side when possible. In tighter kitchen configurations, a 24–30 inch straight-line chimney pairs well with two-burner or compact four-burner cooktops. To maintain visual consistency, align the hood with cabinet doors and ensure continuous lines along the toe kick and reveal gaps for a harmonious layout.
Layout Integration and Clearance Requirements
To protect upper cabinet structures, install heat shields or non-combustible liners directly beneath the hood in high-use kitchens. Maintain a 2-inch gap from side gables to accommodate potential lateral flare from woks. In L-shaped kitchens, avoid any adjacent tall units that could obstruct the capture efficiency. When renovating cabinetry, I quickly prototype options using a room layout tool like Homestyler to assess clearances, sightlines, and duct pathways prior to finalizing construction details.
Makeup Air Considerations and Safety
In confined spaces or high-rise apartments, it’s vital to ensure that exhausted air is adequately replaced. Small passive air inlets or slightly undercut doors can be sufficient for setups under 400 CFM. However, for systems above 600 CFM—especially with gas appliances—it's essential to consult local building codes regarding interlocked makeup air solutions and to ensure no backdrafting occurs with water heaters or boilers. A straightforward smoke test at vents can indicate whether the system is functioning correctly.
Selecting Materials and Maintenance Guidelines
Brushed stainless steel is preferable as it conceals fingerprints better than shiny finishes and withstands degreasers effectively. In coastal regions, opting for 304-grade stainless is a safe baseline, with 316-grade recommended if corrosion is a known hazard. Internally, utilize moisture-resistant plywood with sealed edges. Minimize seams to prevent grease accumulation, and ensure that removable grease cups are easily accessible without requiring tools.
Color Choices and their Psychological Impact
In compact kitchens, darker hood colors can create a sense of receding space, while lighter tones can blend seamlessly with cabinetry for an unobtrusive appearance. Neutral, low-chroma palettes allow the food to take center stage, subtly decreasing the sense of clutter and stress. Consistent brightness across both vertical and horizontal surfaces helps maintain a relaxed focus on the cooking area.
Acoustic Strategies: Softening Hard Surfaces
Kitchens often contain hard surfaces that create echoes. A quiet hood is just part of the solution—incorporate soft-finish runners, sound-dampening wall art located away from splatter zones, or micro-perf panels on nearby walls. Even minor adjustments can significantly lower the reverberation time, making conversations and timer alerts clearer while the fan operates.
Design Trends for 2024–2025
- Sleeker profiles accompanied by enhanced capture trays to boost performance without altering the primary silhouette.
- Magnetic, easy-to-remove baffle filters for quicker cleaning processes.
- Adjustable white LED lighting options that align with circadian-friendly evening settings while maintaining a high CRI above 90 for task-oriented brightness.
- Smart chimneys that automatically increase fan speed when induction cooktops exceed certain temperature thresholds—this is convenient but ensure manual overrides are readily accessible.
Installation Checklist to Follow on Every Project
- Confirm that the cooktop’s dimensions are compatible with the hood and the appropriate overhang is accounted for.
- Verify mounting height within the 24–30 inch range, making adjustments for user height and cookware as necessary.
- Plan the duct route: use smooth metal with the largest feasible diameter (ideally 6–8 inches) and minimize bends.
- Test fan functionality before and after cooking using actual cooking scenarios to ensure optimal performance.
- Measure task lighting levels with a lux meter; the aim should be between 350–450 lux above the front burners.
- Make sure to check heat protection for cabinetry and confirm clearance areas for maintenance.
- Document filter maintenance schedules and demonstrate filter removal procedures to clients onsite.
Understanding Budget Options and Value
Entry-level slim hoods (non-ducted) are reasonably priced, but I recommend investing more in quieter motors, superior LED lighting, and proper ducting systems. Over the product's lifespan, a properly sized, ducted, low-sones straight-line chimney will provide returns in the form of cleaner cabinetry, improved air quality, and fewer odors infiltrating living areas.
Frequently Asked Questions
Begin with around 100 CFM per 10,000 BTU for gas cooktops; for light electric or induction usage, 150–300 CFM is sufficient, moving up to 350–450 CFM for frequent searing and 500–650 CFM for heavy frying or wok cooking. Balance these needs with makeup air considerations and noise levels.
Generally, the optimal height for hoods is between 24–30 inches above the cooking surface; I find that 26–28 inches tends to be the most effective for the average user, with minor adjustments for taller individuals or large cookware.
For heat and moisture extraction, ducted systems are superior. Ductless options may work in condos without wall access, provided that you utilize high-quality carbon filters and replace them every 3–6 months with regular cooking activity.
Seek out models that operate at 1.5–4 sones during use, consider inline or external blower units, adopt the habit of pre-boosting (operating the fan before cooking), and avoid restricted duct runs to optimize performance.
Target a lighting intensity of 350–450 lux at the stovetop area, with a color temperature ranging from 4000–4500K and a CRI of over 90. Adding diffusers will help to mitigate glare; supplement this with dimmable under-cabinet lighting for consistent coverage.
Choose baffle filters for intensive cooking and mesh alternatives for lighter uses. Carbon filters are solely for scent control in ductless environments, not for grease capture. Clean baffle filters every 2–4 weeks if you cook often.
For systems under ~400 CFM, existing air infiltration might be adequate in most homes. For models at 600 CFM or higher—particularly gas systems—it's wise to check local regulations and think about interlocked makeup air solutions to avoid backdrafts.
Yes, straight-line chimneys excel in their ability to maintain upper storage and sightlines while being positioned close to the plume for improved extraction efficiency.
Aim to match the cooktop width at a minimum; extending by 3 inches on either side can enhance capture where space permits.
In active kitchens, it's advisable to install heat shields or non-combustible liners beneath adjacent cabinet surfaces. Maintain a small lateral clearance between side gables to prevent heat staining.
In many instances, a duct chase can be integrated into your cabinetry plans or soffit. Start ductless and transition to ducted when building codes permit openings.
Recommended maintenance interval is every 3–6 months with regular cooking; sooner is advised if frequent frying leads to lingering odors.
Definitely; ensure that the color temperature remains between 4000–4500K with a CRI of over 90 to accurately assess food doneness without harsh lighting.
Absolutely—fabricate cabinet clearances, duct pathways, and hood positioning using a layout tool like Homestyler to proactively identify any conflicts during the planning phase.
Discover your home's potential with Homestyler! This user-friendly online design platform offers an intuitive design tool, stunning 3D renderings, and a wealth of DIY video tutorials. Whether you're planning a makeover or starting from scratch, Homestyler makes home design accessible and fun for everyone!
تصميم الآن مجانا
































