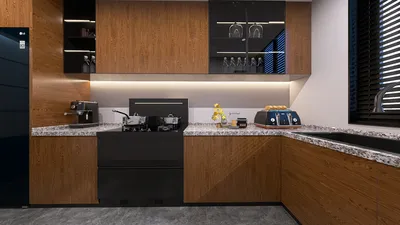


I frequently design small urban kitchens that completely eliminate upper cabinets—this is often a choice made for aesthetic reasons, but can also be due to structural limitations. By opting for a cabinet-free design, you can achieve a sense of spaciousness, improved natural light, and cleaner lines, as long as you reconsider storage solutions and workflow from scratch. The objective is to create a flexible, ergonomic space where all essential items are easily accessible, ensuring clear movement and surfaces that encourage daily cooking activities instead of cluttering.
Making data-driven choices enhances spatial efficiency. The WELL v2 Kitchen & Nourishment recommendations stress the need for proper task lighting during food preparation, while the IES suggests a range of 300–500 lux for countertop work; aiming closer to the higher end enhances safety while cutting and reading labels. Regarding ergonomics, research from Herman Miller emphasizes that frequently used items should be positioned between shoulder and hip height to reduce strain—this is particularly relevant when transitioning storage from upper cabinets to wall rails and counter-level solutions. I incorporate these requirements for illuminance and reach into the design concept from the beginning.
The psychology of color significantly influences perception: According to Verywell Mind, lighter shades can make small spaces appear more expansive, while cool colors foster tranquility. In practical terms, soft gray-greige walls, matte white tiles, and light ash or birch countertops effectively reflect light, diminish visual clutter, and elongate sightlines. A carefully selected color palette combined with warm 2700–3000K under-shelf LEDs ensures the kitchen remains cozy at night while still benefiting from daylight clarity throughout the day.
Maximized Storage Without Upper Cabinets
With the absence of upper cabinets, storage must be reimagined and redistributed. I employ a tiered method: full-height pantry pull-outs, deep drawers for cookware and dishware, along with open wall systems for tools that are regularly used. A pantry pull-out measuring 12–16 inches in depth can outperform traditional upper cabinets because it allows for full visibility and accessibility, thereby preventing the annoying "lost items" issue so common with cabinets. For dishware storage, I utilize wide drawers equipped with plate pegs to ensure stability and ergonomics, while cutlery is organized in narrow top drawers using dividers to maintain order.
Flexible Storage Solutions: Wall Rails and Pegboards
Wall rails featuring movable hooks and small containers transform the backsplash into a functional storage area where essential tools like ladles, tongs, and knife magnets can easily be accessed. Steel pegboards or slatted wooden panels offer modularity—allowing the user to adjust peg positions for pots, pans, and other utensils. It's advantageous to keep floating shelves no deeper than 8–10 inches to avoid shading issues and preserve clean sightlines. Maintain an organized look by styling the top shelf and making the lower shelf practical, achieving a harmonious rhythm in the design.
Functional Under-Counter Storage and Slim Pull-Outs
Base cabinets play a crucial role in maximizing functionality. Utilizing deep drawers significantly enhances usability; they outperform traditional cabinet doors by ensuring contents remain visible. I recommend integrating 6–9 inch pull-outs for spices and oils next to the cooktop, and a 12–15 inch trash and recycling pull-out near the sink to maintain workflow efficiency. Additionally, consider incorporating a toe-kick drawer along the base perimeter for hiding baking sheets or trivets. This layered storage approach compensates for the absence of upper cabinets while keeping countertops organized.
Compact Layouts That Enhance Flow
I strategically design counter placements and appliance layouts to preserve a compact work triangle. In galley kitchens, aim for a minimum distance of 48 inches between counter runs; in tighter spaces, 42 inches is still workable. If you're undertaking a redesign, a layout tool can be instrumental in simulating clearances, traffic patterns, and sightlines before finalizing hardware choices—consider using a simulation tool to visualize different zones and test appliance movements, ensuring there are no traffic jams near the range or sink.
Lighting: Prioritize Task Lighting, Then Ambient
Without the addition of upper cabinets, lighting becomes essential for functionality. I prefer mounting low-glare LED strips beneath floating shelves or rails to deliver adequate illumination of 400–500 lux in preparation areas, complemented by dimmable, high-CRI pendants positioned over the eating bar. Set your lights to 2700–3000K for warmth in ambient lighting while using 3500–4000K for task-oriented strips when clear color rendering for food is critical. Avoid glare by selecting diffusers thoughtfully and positioning fixtures away from direct sightlines.
Surface Material Selection and Visual Simplicity
In tight spaces, the texture of materials matters significantly. Matte surfaces minimize reflective chaos and fingerprints; honed stones or recycled composite countertops effectively conceal minor messes better than polished alternatives. Opt for textured tiles with subtle patterns to add dimension without overwhelming visual complexity. Sustainable selections—such as FSC-certified wooden shelving and low-VOC paints—also contribute to better indoor air quality, particularly when ventilation is limited.
Managing Small Appliances and Docking Areas
Countertop appliances can quickly disrupt the sleek appearance of a cabinet-less kitchen. I designate a docking shelf or niche for frequently used items (such as kettles and toasters), while occasional-use devices are stored in deep drawers. Utilize cord clips under shelves to keep power cords orderly. If space allows, a narrow appliance garage with a roll-up door might fit on the counter, but in many compact kitchens, a 10-inch floating shelf with a power strip beneath is an efficient solution.
Smart Organization Techniques
Employ uniform containers and labels for dry goods; transfer them into clear jars for easy inventory checks. Keep a go-bag for picnic assets or specialty baking tools to prevent clutter. A magnetic strip for knives and another for spice containers ensures that flavor remains within arm's reach without sacrificing counter space. If ceiling levels allow, consider a ceiling-mounted pot rack above an island to increase storage options without crowding the space.
Ergonomics and User Considerations
I measure my clients’ reach and dominant hand to appropriately set wall rail heights—typically between 48–54 inches above the floor for average users, adjusting to 44–48 inches for enhanced accessibility. Store heavier items within 24 to 48 inches off the ground. Drawer handles should allow a comfortable grip; while small edge pulls are sleek, they may become cumbersome when the drawer is fully loaded. Traffic flows dictate the arrangement of hot zones (such as ranges and ovens) versus cold zones (like refrigerators), which I navigate to avoid potential collisions near doorways.
Sound Dampening and Ease of Cleaning
Open kitchens can amplify auditory disruptions. Opt for soft-close hardware, place felt pads under utensil holders, and use silicone mats under metal bins to reduce noise. Choose easy-to-clean paint and tile grout that resists staining; without upper cabinets, the walls may attract more vapor, making quality extraction fans and easy-to-wipe surfaces vital.
Using Color for Perceived Space
Color calibration extends beyond aesthetics. Light, low-saturation colors can create an illusion of depth. To add contrast, limit it to a singular band—like dark countertops against lighter walls—rather than multiple competing colors. Warm wooden accents can introduce comfort without visually minimizing the space, while a singular bold accent color (like olive or indigo) on smaller accessories adds character without cluttering the visual space.
Effective Tips for Kitchens Without Cabinets
- Install a wall rail with a knife magnet and small caddies above the primary preparation area.
- Transform two base cabinets into deep drawers with dividers and plate pegs.
- Incorporate a 6–9 inch pull-out for oils and spices next to the cooktop.
- Place dimmable LED strips beneath shelves with a target of 400–500 lux on counters, aligning with recommended IES task lighting levels.
- Utilize uniform jars for dry goods; label the tops for easy visibility.
- Keep a folding step stool in a toe-kick drawer if utilizing high shelves.
- Limit the depth of floating shelves to 8–10 inches to avoid shadows and hazards.
Frequently Asked Questions
Organize by zones: keep prep tools on the rail, dry goods in uniform jars, and dishes in deep drawers. Conduct a quick maintenance check weekly—returning everything to its designated places will help prevent clutter from building up.
Guidelines from the IES for residential task areas usually convene around 300–500 lux. Target 400–500 lux for preparation zones, pairing it with dimmable ambient lighting to mitigate glare.
Maintain limited shelf depth, utilize consistent containers, and strive for a 70/30 balance between practical and decorative items. Reassess items seasonally; if something doesn't serve a purpose, consider relocating it.
Store items in the middle drawer tier (approximately 24–36 inches off the ground) with adjustable dividers for convenience. If ceiling height permits, a well-balanced pot rack above an island can also be effective but avoid blocking sightlines.
Employ warm ambient lighting (2700–3000K) paired with slightly cooler task lighting (3500–4000K) to find a balance between comfort and clarity. Aim for high CRI (90+) levels to enhance color rendering for food.
A narrow pull-out beside the cooktop or magnetic spices mounted on a rail will keep them visible and accessible, streamlining your prep time while managing clutter.
Design workflows around your sink, cooktop, and prep surfaces. Utilize a room layout simulation tool to validate traffic flow and clear access points before installing any fixtures.
Absolutely, particularly around the cooking area. Keep shelves away from the primary grease zone, utilize a quality extraction fan, and select finishes that are washable.
Implement soft-close drawer options, use silicone mats under metal items, and consider small washable area rugs to absorb sound impact while ensuring cleanliness in the kitchen.
Yes, particularly for visibility and ergonomics. Deep drawers present contents up-front, minimizing the need to kneel or reach into dark depths, which is especially crucial when upper cabinets are not an option.


Transform your home with Homestyler! This intuitive online design platform offers an easy-to-use design tool, stunning 3D renderings, and a wealth of inspirational projects. Plus, with DIY video tutorials, you'll have all the guidance you need to bring your vision to life. Start designing today!
Design Now for FREE
































